Sunday, March 24, 2019

UFO Sprint - part 1

I am blessed to know and be friends with a few writers. They allow me to encourage them and to comment occassinally on their works in progress.  One specifically, has returned the favour by pointing out to me that when I was complaining about body image and size that I can sew. So I should DO SOMETHING about my issues that way.  Captain Obvious moment, I know.  But she had a point.

So, this weekend, whilst Sasha is writing, I am working in my shop in solidarity.  I am in the world of the UFO - the Unfinished Objects.


Task 1 - mend 2 pair of RTW pants (completed)

Task 2 - add lining to jacket conversion since Spring is teasing us, I need to get a jump start on the spring office wardrobe. Will post before and after shots of this when completed.

Task 3 - finish a pair of pants from the Florida  trip (hangs head in guilt that they are still not done), but the goal is to wear them with the jacket conversion this week! Feel free to nag me ...

Task 4 - cut and sew new top to complete outfit. Not sure if this is realistic for today, but am going to try. If not tonight, then will aim for tomorrow.

Sewing in the Sun 2019 - Post script #1 Muslin, Muslin, Mulsin!!!

Aside from the amazing pant progress, I came away with some other thoughts from the weekend.  Seeing as this is my place to ponder, I am taking full advantage of my own platform.

As I want to keep these posts from being over long, I am going to deal with these in separate posts.  Here are the four areas I will be covering over the next few days:

  • MUSLIN, MUSLIN, MUSLIN!!! 
  • Sometimes the obvious is not the right path
  • Patience matters
  • Fabric choices matter
Muslins. To some an unnecssary evil, a tedious trial, a painful process or something to be avoided.  I am one who used to avoid them on patterns that were easy or not fitted as they seemed to be redundant. Why take the time to muslin a T shirt/A line skirt/shift dress/ {insert your choice here}?

Because it matters.

Monday, January 14, 2019

Sewing in the Sun 2019 - Tummy Tamer Pants

These were a challenge pant. A challenge to my personal view of myself. Can I wear a close fitted pant and not look like a sausage?  I have an aversion to under dressing my age, and slimfit were not in my comfort zone. This weekend was a way to confront all those self images head on and just blast through.  I bought this pattern because Pam Erny posted about how she loved them and that she had reduced the height of the cut on waist and still maintined the shape.  That convinced me to try, and I ordered the pattern and some aubergine stretch twill just for that design.

At last!  After teasing the Tamers, here they are...

Pattern details:
Pattern size: 18
Alterations made to be carried over to other pants

  1. Muslin 1 - 2" added to side seams; used cutline for size 18 as seamline
  2. Muslin 2 - full thigh adjustment from Miracle Pants added (approx 1" across the fullest part of my thigh running from crotch to knee)
  3. Muslin 3 - thigh adjustment increased
  4. Muslin 4/Prototype 1 - massive amount of fabric pinned out (yes, you can have too much of a good thing, in this case stretch of the fabric)

Muslin 1
Muslin 2 - Post thigh adjustment

Muslin 3 - reduced thigh adjustment


The final result are in a black poly stretch woven, so the detail won't show in the photos, so here is what you cannot see:

  1. The high waist has been lowered to suit my rather short ribcage
  2. This really stretchy poly meant that I could eliminate the back zipper
  3. This really stretchy poly meant that I eliminated the front darts
  4. No length added to the leg
  5. Final side seam was stitched with a slight bump at the top of my leg for shaping.  That is the unpressed bump you see in the photo below (compounded by the tucked in top)

Due to the stretch in the black poly, we (meaning Trudy - I just stitched it) changed the full cut on waist facing to  "Hollywood waist" a new term for me. Basically, we stitched an elastic to the facing and turned it to the inside and crack stitched it. This prevents the waist area from growing through wear. Also due to the fabric, we tweaked the crotchline at the inseam and reinforced the line with bias twill tape.

The biggest change to the pattern was the thigh adjustment.  I went into this weekend with a blank slate, akthough I was certain the issue that plagued my front was a tummy adjustment and hip adjustment.  After all, there is a pooch and some hips happening underneath, so that had to be accounted for, right?  WRONG.  My thoughts on this will come in a different post - where the obvious really isn't.

This pant took 3 muslins before Trudy said those terrifying words "You are cutting the next one in fabric! Oh yes, you are!  Do you trust me?"  I realized I really did, although it came across as deer in headlights and doubt. I was just so overwhelmed at the changes we were making on the fly and how successful they were.  By the time I was cutting into the next version, others were into their second pair. Not because I was hard to fit, but because we went incremental in the adjustements and the fabric.

Version 4 was in a 4 way stretch navy pinstripe. We watched it grow on me as we pinned it closer.  As we basted and fitted it right side out, I need to transfer all the new seamlines to the inside and then restitch.  That one is sitting in the suitcase for completion at home. No photos of those, I will take them at home and post them when they are complete.

Version 5 took the new muslin and went into the black poly I am wearing home. Note that I tucked my top in so that you could see the waist hip fit. So there is some lumps showing from that.  And the fact that I only had one cup of coffee to this point.
Front view
Back view
Verdict: I LOVE THESE PANTS!!!

While I really want to make these in the aubergine, I am starting to think that I need to revisit the Tailored Track Pants and redo the muslin with the proper alterations


Saturday, January 12, 2019

Sewing in the Sun 2019 - More about Muslins (Tummy Tamers)


Tummy Taming Trousers v.01
Pattern pieces - Size 18

What I was told to do
- cut in a woven fabric (prefereably muslin) and add 2" in width at the side seams only. Add invisible zip, stitch darts down, put fronts together, then backs, then stitch from crotch seam down for each leg, then pin/baste sides

What I did:
          • cut the pattern in a size 18
          • no alterations to the pattern
          • folded the waist facing down to better guage the waist placement
          • Did all the stitching as advised. 

Close up of waist facing folded down
Traced pattern - green original cut line; red 3" cut line

Observations:
Those are some very deep darts ... lots of shaping around the belly to be had there. Or not. Depending on if they are sewn on my body.

There is zipper extension at CB - this is important to notice as the instructions make the seam allowance here LARGER than the 3/8" stated. This provides more real estate for your zipper, which I like. I may enlarge it further in the final as I like facings.

LOVE the hip curve ... because well, I have some curve of my own. Thus the need to fit pants with help!  Take a look at the shaping on this puppy!  The stitch line shown is on the original cut line for the 18. The seam allowance is the recommended 2" for side seams only.

The instructions say to pin from the side as you should be able to reach and do this.  (Note to self - enroll in yoga classes as twisting and turning to see around the bustline is a laughable event, especially when wine was involved!)  I was not able to do this effectively, resulting in some bent pins as I tried to pin the waist/hip area. So I used a pencil to mark where the pins should be and then basted that way.

My intent was to stitch the pieces together so that all the seams were external.  But my brain did not send that memo to the hands that pinned and fed the fabric to the machine.  So the inseams and darts are inside and the side seams are outside on this version.

What the first muslin looks like (with the attempt at fitting the sides):


Here is the unaltered fit (again just the 2" on side seams) with a belt drawn on as I am adding belt loops on:


Again, the thigh work and we are also shortened the waist height a bit.  There is some reshaping over the CF seam and possibly the CB  as well.  Am cutting muslin 2 now.  Will post the after as well.

Friday, January 11, 2019

Sewing in the Sun 2019 Q&A

People are asking questions so I thought I would compile my answers into one place for the whole series of posts. This will be updated if people post more.

Debra919 said...
What I want to know is how difficult it might be to add 2 inches to the sides with no lines to guide you... how do you do that, and are you supposed to know HOW to do it if you take her class?
Debra, it really is simple. All I did was layout my pattern on the fabric, trace around it and then mark 2" away in a different colour and cut on that second line. Flipped the pieces over and did the same on the second piece.  Here is a sneak peak of the second pattern at that stage.


Unknown said...
Hi Lorna, congrats on it your strong leg thighs( and cute butt and properly fit belly).
So your thighs had to be increased in size, to remove the back wrinkles? Jeanie
Yes.  Areas with more real estate need more coverage AT THAT LOCATION.  Adding to the side seams did not release the stress point where I needed it.


Sewing in the Sun 2019 - Unexpected Miracles


DISCLAIMER!!!
This series is NOT intended as a set of fit lessons. I am not an expert. This is just a record of what I am doing this weekend, for my body type with these patterns. This is not intended as a summary of the lessons learned Sewing in the Sun weekend.  This is just my projects, in the rough, with personal commentary.

This series is NOT going to be a complete review/play by play or substitution for attending the session.  What works for me will probably not be your solution. This became very obvious today, when all of us stood up and described the same fit issues (from our individual points of view) before we put out muslins on for analysis.  We all said the same or very similar words. But we all ended up doing did different alteration packages to achieve the same results. Why?  Because what we THOUGHT were our problems, really were not.

I have spent the past 20 years sewing pants. I have sewn jeans.  I have had varying levels of success before my weight and shape changes.  I had assumed that because I gained, I had to add where needed.  So I began chasing the Doormouse down the rabbit hole. Never getting where I needed (yes, I know, Alice chased the Rabbit, but Rabbit gives me wine, so I chase the Doormouse.  Because I hate Mice).  The amount of time I have spent never getting rid of wrinkles, frowns and smiles is legion.Other than my jeans, I usually wear a fuller trouser, so the issues that came up with the Tailored Track pants and the Miracle Pants were not as obvious and thus ignored. The more fitted pants, however, brought it front and center.

Thighs. Stairs, walking, hiking and a few years wearing combat boots have given me strong front thigh muscles.  By reading all the wrinkles and so on in the many books and DVDs, it seemed obvious ... it was crotch length and depth ...right?  Maybe?  Ish? Is the moon green on a Wednesday in June? Who knows?

Trudy knows.  She said your crotch is fine.  The bum is great (why thank you, lady!) and you really are OK in the belly. "But here ..." I pointed.  "And here?".  She shook her head and said "That is NOT your problem.  Your problem is your thighs. Lift your leg and see what I mean."  My head is still spinning.  Thighs. Not my belly. Way to boost my ego!  I have lost the weight of my world.  My belly is not the problem.  It is my thighs.

Two rounds of hacking and slashing later (and discovering that I had cut the inseam of the front at a size 20 and NOT the assumed 18), I cut into the ponte.  AMAZING!!!!  No wrinkles. Everything drapes so much nicer.
Edit point: This is where I also add that I cut back the inseam on the back one size to the 16 from the crotch seamline down. I maintained the crotch at th size 18 lines.  That, and folding up the hem, removed the back wrinkles in the muslin.

Somehow between muslin and ponte I lost height at CB, so I am doing an external application of the elastic.  (Had I remembered to add the Trudy suggested extra inch to the waist when I cut the ponte, this would not be a problem.)  As these are more of a lounge pant weight, it will work. That will be tomorrow morning.

I am NOT posting pictures of the alterations. I do have them, but I have been getting requests and messages asking for my notes so that people can follow along and use my alterations for their solutions.  As I learned today that does not work. So, if you were hopeing to see a play by play of this session, you won't.  You saw the before, you will see the after.  The in between, you will get highlights by text.

Thursday, January 10, 2019

Sewing in the Sun 2019 - Musing about Muslins (Miracle Pants)


DISCLAIMER!!!
This series is NOT intended as a set of fit lessons. I am not an expert. This is just a record of what I am doing this weekend, for my body type with these patterns. This is not intended as a summary of the lessons learned Sewing in the Sun weekend.  This is just my projects, in the rough, with personal commentary.

The urge to start fitting this pattern was almost overwhelming!  It is like washing and styling your hair before you go get it cut ... you just HAVE TO, right???  So, here is it is ... all in its unvarnished and unaltered glory.

What I was told to do:

Cut the pattern in a woven, add 2" to the side seams, stitch the fronts together, stitch the backs together, then do the inseam from crotch down, per leg. Pin the sides together and baste (remember my yoga comment??? That reappears here!).

What I did:
I did all that. :) 

Rear view, unaltered, side seams pinned on original cut line, s. 18
What a nice crotch curve that is ... such a  nice fit, you say. What you do not see in this photo is that the pattern is not fitted as close as it should be (Ithink) and then there is the major gap between the fabric and my back. Could be sway back or hollow back or just MYBACK.  Regardless, there is substantial space there, this IS the elasticated waist, though.  My fear is that the back will have too much bulk as is... I think something needs doing there. Then there is all that mess below the curve. We will see what tomorrow brings as this is a common occurence for me. 

Side view
 So, the side view shows that I am officially off balance. That could just be me twisting in the photo frame, but I suspect not. The front needs more of, well, everything except me! See next photo for that proof of life ...

Front view
So, this nicely shows that lovely hollow at the top of my thighs that causes issues with every pocket I add to pants that involve the side seams, also showcases my lovely belly below my button and the crease that lies above it.

When I was working on the Tailored Track Pants, I had similar issues and tried to self diagnose.   I did a full belly adjustment that bled over into other adjustments that led into still others.  At that point in the tailoring rabbit hole, White Rabbit hopped by and offered me a bottle of wine and said quit while you are behind and make something else.

So my lovelies, you have seen me in all my glory ... tomorrow, this pattern gets the Trudy treatment. Stay tuned!

Sewing in the Sun 2019 - The prequel.

A year ago, my friends Trudy and Jeremy over at Hot Patterns designs offered an extended weekend of sewing IN FLORIDA and aptly called in Sewing in the Sun.  I was swamped in deadlines at ork and could notn make it, but immediately added it to the budget and calendar ont he off chance it would be re-offered in 2019. After all, a weekend in JANUARY in warm and sunny Florida or stay at home in near zero (F) temperatures in Canada .... really, is there a choice?

When the 2019 event was posted as a pant fitting session, I jumped at the chance to get in on the action!  I booked myself in and put that budget to work! As this will involve fittings and photos and notes, I am going to summarize my thoughts at night and present my weekend immersion in pant fitting.


First off - the patterns.  The designs chosen by Herself (Trudy) for the weekend were two that were sitting and aging in my stash. While I do not mind fitting pants, I am not an expert by any means, and am never quite satisfied with the results. Mostly because I am never satisifed with the body shape wearing them, I suspect (but that is a whole other blog series, I suspect).  The two patterns were never sewn up because they intimidated the hell out of me. Both are intended for stretch fabrics and are close fitting. While I have sewn knit pants and stretch woven pants, the narrow pant and design scared me away as I felt it would show all the lumps and bumps unless I modified them so as to be a looser pant. Which defeats the purpose of the design.

So, I went shopping with the Senior (she who used to be called the Diva, but outgrew that stage and is now in her senior year at HS). She forced me into narrower styles and advised that she "would happily be seen in public with me if I wore them". High praise indeed!  So, fear hurdle jumped. No excuses.

Here are the patterns and my impressions:
HP 1127 Tummy Taming Trousers - a stretch woven, high waisted narrow pant with optional ankle crop length and CB zipper

  • Narrow pant - see para above. No excuses.
  • High waist is a new style on me. I tend to feel like I am short waisted, so this could be a fit challenge. BUT no excuses  - Pam Erny, respected sewer and interfacing goddess supreme loves hers and she decreased that height and still kept the look. So, no excuses.
  • CB zippers and I have a love/hate relationship.  I have a hollow type back/sway back (not sure the difference) and a curvy bottom, so invisible zips that could split are not my fave.  BUT those are fit challenges that I can overcome. So no excuses.
  • Stretch woven is a godsend for an office worker who sits most of the day. AND I have stash bought just for these at the time. No excuses.

HP 1227 Miracle Pant - a narrower knit pant with flat front but elasticated waist with an internal elastic application that eliminates the sweatpant look.

  • Narrow pant (insert broken record soundtrack here, LOL!)
  • Elastic waist with flat front - means I can wear to work in the biz casual office with a jacket
  • Ponte pants mean ultimate comfort - why not???
The task before arrival was to cut out a muslin of each pant, using a woven, fitting close to the body.  And bring fabric.  So I did. I am sitting now, typing in my hotel room in Florida. I left snow squalls and plummeting windshills today and am now sitting in capris and a tshirt.  About to go get some sun. :) More about muslins in the second post.


Sunday, October 18, 2015

Spadina musings

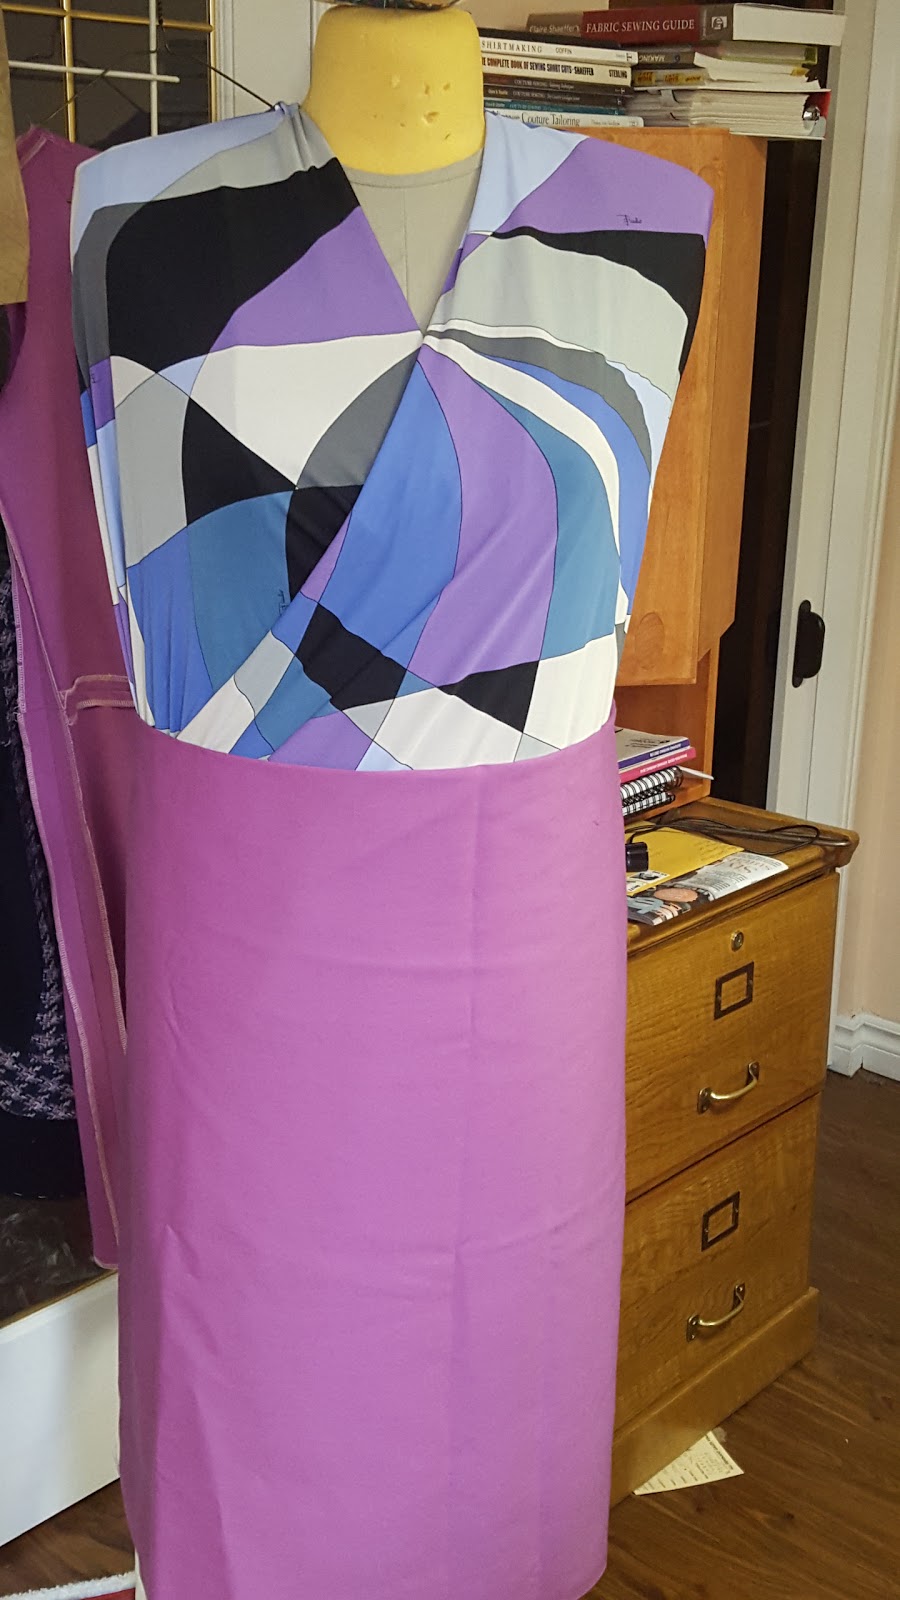
Now that I have the garments chosen, I need to finalize fabrics and patterns.  I did some block draping with two knit prints that will be tops and the two skirt fabric options.

Tops - Pucci print and a silk jersey paisley
Skirt - wool grab and lightly felted wool

I also draped the Pucci as a wrap style dress.  I live the colours, it is most definitely my colour path, but am worrying the print will wear me rather than the reverse if I do this in a wrap.  I have never worn a large scale print like this full body.  Huge leap here...


Saturday, October 17, 2015

Trilogy part 2- the Tunic

I realized that this is posted out of order...  this was supposed to post BEFORE the Spadina Collection post.  I published the wrong draft first ... sorry!

I am not sure about tunics on me and my shape.  As I am somewhat curvy, they tend to look chunky on me.  I am also not one for belts as I find them uncomfrotable when sitting at a desk.  But that could also be a posture issue.  I think the length hits me wrong as well.  Believe it or not,there is a waistline in there.

For this one I used a wool challis in a wonderful paisley print that will go with denim or wool suiting.  Love it to death!  What I did not realize is that not all challis behave the same.  The Trilogy calls for RAYON challis.  Different drape all together.  Still nice but not tunic drapey, if that makes sense.  Will have to think hard about which pattern I choose for the rest of the fabric.

This might have been better for the bias version...


Spadina Collection

I have given up in the HP Trilogy pattern... but only because fall has arrived in Ottawa and I am cold.  So, the bias version and the top are delay until either spring or a trip south.   On the upside, the question of proportion has been solved.  I belted the challis the tunic length and bloused it to the top length.  Eureka! So, one day when I REALLY want to wear it this winter, I will pull the side seams and chop her down in length!  It will work well with the SWAP (Sewing with a Plan) I sort of have in mind.  The paisley colouring will go well with the bottoms planned and already completed.

I am calling this capsule the Spadina Collection.  It was inspired by my wonderful visit with MaryBeth and Els in Toronto a few years back.  We spent the day wandering the Garent District.  I was in seach for a fabric to coordinate with a piece of wool boucle I bought at Darrell's.  I was looking for burgundy, but was convinced to go WAY outside my comfort zone and try a deep lilac/mauve colour instead.  I have spent the intervening years avoiding the cloth.  Now that I am working in a professional office, I needed to get at it!

The jacket has been progressing, but I am taking my time here.  I have spent time on this one, adding a canvas mount, interfcing the boucle and adding organza interlining and padstitching.  It is my skils project.  Before I put the sleeves in, I need to decide on the lapels.  They are quite wide, very on the 70s trend right now, and I think I can pull it off as I am not a small woman.  I just don't want to date the jacket.  I want it to stay classic.  SO, before I put sleeves in and add the lining, I need to decide.  What do you think? The sleeves will be the same blue as the peplum and lapel.


The shift dress peeking out from underneath is the fabric from Toronto.  It is ready for sleeves and neck facing and hemming. The stalling point is that I have decided it needs a lining.  That means I have to go back to the cutting board and cut the dress out again.  As my sewing time is limited, I need a day to to that and then sew it.  I am very happy with the fit after some tweaking and consistant excerise.


I have enough of the wool gab from the dress to make either a top or a skirt. Decisions, decisions... am leaning towards the top for versatility.  The fact that I have some luscious Pucci knit that will coordinate is one of the things pushing me to a skirt.  I do have other top options to go with said skirt, though.  So maybe it will become a skirt.

The real battle in my head is where to go next.  I am in SUCH a need for
office wear that I do not know where to logically start!  I am not sewing many TNT patterns as most of those are not fitting or are too casual.  so quick question ... do I START WITH THE BOTTOMS (PANTS) or do I start a marathon of tops and then move on to the pant marathon?  Is it better to sew outfits or or pieces?  How do I stop overthinking this??  If I was shopping, I would buy outfits.  Logic says I should start there.  So, a simple bottom and a couple of tops.  To stay with the thread on the machines I will do the pencil skirt and the Pucci print, then perhaps a button up in a classic stripe. Then move on to a pair of pants.

Pucci print
This where I will start.  I have been trying to determine what pattern will suit this lovely.  Was thinking dress, but now that the weather is cooling off, it will be a top with enough for a flirty skirt come warmer weather.  I think I even know where I am going to start pattern wise!

Sunday, July 12, 2015

Tale of the Trilogy - Part 1


After a raft of fit disasters on previous projects, I have been avoiding my sewing room and sulking.  My hour glass silhouette has turned more pear shape in profile resulting in some major body image issues.   This then led to changing how I sewed and resulted in the aforementioned disasters.  I went back to basics - starting with size.

I think I was sewing too big on my last few attempts.  I think I was so bothered by my weight gain that I was sewing his I felt, not how I actually looked and measured.  Going back to almost a sloper was just what I needed.  Guess I have not gained as much as I thought... Either that or it is actually starting to come off due to a change in eating habits and going for long walks.

Too hot to garden and fighting a headache Saturday... Excellent day to devote to sewing!  Two pattern muslins cut for Hot Patterns latest release the Fast and Fabulous Trilogy Shift dress tunic top.  A basic pull on shift dress, it comes in three lengths - top (at low hip length), tunic and dress length.  Due to the above, I was a bit hesitant to order this as I did not want another garment that did not suit.  After chatting with Trudy, I decided to take a chance as there is more shaping than in the pattern picture.  For the hourglass silhouette that turns to a pear profile, This dress is a great fit!  There is very little shaping on the sides and CB but none at CF.  That was a concern as I do not like tents except to sleep in!

Muslin #1 - Cut out the top only (without the added length) as this was purely for a baseline fit.  Cut a size 14 without alterations first to see what was really needed.  The fit was pretty damned close.  The only change to the base pattern was to add some shaping to the CF from under the bustline to the waist.

Body of the top without the length extension; no added shaping or seam allowance; straight 14

As you can see there are some drag lines in the high hip area even though the Side seams are hanging straight.  I thought I would have to blend to a 16 below the waist.

Muslin #2 is a rayon batik in the full dress length.  The sides have the extra width and I have increased the shaping at CB as well to cover off a hollow back.  This fabric was a gift from dear friend MaryBeth a number of years ago.  This fabric was reclaimed from the very aging stash of the Diva.

This turned out to be wearable ... maybe not to work as this is quite lightweight fabric, but a runabout dress all the same.  I have yet to hem it and I did end up doing 5/8" s.a. vice the 3/8".  In hindsight, I could do the 14 without blending to the 16.  The Pilot suggested more shaping at the waist but if I do any more I will have to add a zipper to take it on and off. Not something I want in this version.
Size 14 w/shaped seams

To appease the Pilot, I took some fabric remnants and mocked up a self fabric belt.  I like that look much better.  I may add some loops to the side seams once I finish the belt. This version still needs to be hemmed so it will be shorter by about 1" all around.  It hits me at mid calf.  Not sure if I like that length on me.  Once it is hemmed and the belt is done I will post a final shot of me wearing it.  The Pilot liked it and The Diva did not veto it.  I guess it is a keeper!
Self fabric belt option after taking in seams to 5/8"


Version 3 will be a knit version.  I have some luscious Pucci knits to choose from.  It will definitely be the 14 with 5/8" seams and more shaping.  Then I have to decide on fabrics for the tunic length and the top.  After all, it is the Trilogy pattern!


Still considering the bias cut version for fun... That will be another start from scratch muslin attempt.  After seeing the shaping, though, it would have to be the tunic and not the dress.

Tuesday, September 02, 2014

Many Happy Returns

I have a love hate relationship with blogging.  Before I Went back to work full time, I sewed A LOT for my kids and did casual wear for me and the Pilot.  Blogging allowed me to do detailed reviews of the projects in a forum that I could link back to in a couple of sewing sites I frequented.  As I got busier with volunteering and working part time, I found I wanted more to sew and less to write.  I wanted to maximize my time available to me but mainly I realized that I was writing more for me and not for anybody else.  Therefore my notes to self can be written in a book on PAPER with a pen if needed. It is not like I am famous, or have clients that follow me religiously, so I stopped blogging.  As I changed to full time work and even more full time volunteering, I discovered that I really had no desire to sit and write about my sewing.  I stopped writing reviews and just plodded along when I was able to sew.  To get that community feel I used to have online, I joined a few select FB groups.  For quick one offs of posting a project or a question, that served me fine.

What has not changed is that I am still not famous and don't have a huge following.  Not sure I want one, to be honest.  I have a few select friends and followers that I know will read and may or may not comment.  Maybe more will show up (especially if I link to said FB groups).  Who knows?  What I do know is that I am no longer volunteering.  It was becoming to stressful as I could never figure out how to stay on the sidelines and not go all in.  So, this year, I am out.  Of it all.  My nights for me and the occasional work session when required.  I. Can. Sew!!!  I can attack my stash of fabrics that I have acquired thanks to my dear friend's store (Darrell Thomas Textiles).  I am determined to make myself that work wardrobe that I have been dreaming and chatting about for years.

While I do have that nice wool boucle jacket still on the table, most of the hand work on the bodice has been completed.  Now it is stalled at the facings.  I have to be in a good place to do collars, cuffs, closures and waistbands or things go wrong fast.  So I am plodding on that one, but have started a faster one - the HP Fast & Furious Four Seasons Kimono Jacket to get me into the swing of things.

I started with this for a couple of reasons.  We are into late summer here in the Capital, which means any weather goes, but it usually muggy.  I am in a new building at work with a much more reliable HVAC system and sit in front of a window.  I figured this could be perfect for coolish mornings and AC in the office.  I also wanted to use up some lovely linen I bought from Darrell.  I think this was through one of his charity sales, cannot remember.  It also coords nicely with the print I recently used for two other recent projects (a top and a dress) as well as other extant wardrobe pieces.  Three Pieces.  Cannot get much faster than that.

This is where the blog comes into play - I am not sure if I like the pattern ON ME or not.  So, rather than focus on the FB groups where there are HUNDREDS of viewers who will gladly opine, I am going to focus my thoughts here and then see what/who pops up to give added value to my projects.  Blogging is more of a conversation than FB can be.  Especially for sewers.  Will this turn back into a full recital of everything I do and each detailed step I take?  No.  There are others far more skilled than I taking up your blog time.  I want to chat about the projects that mean something to me at the time of construction and get some feedback/encouragement when needed.

It goes together quite easily and I like the shaping the vertical darts give the pattern.  The facing being top stitched down gives a sporting look and could be switched up by doing an external facing with piping easily.  Lots of play room.  I tossed this together very easily, forgoing the bound seamlines and serging instead as this was intended to be a semi casual topper.  What is not to like?  I received lots of "Likes" on FB when I posted the pics today - both on me and on Mindy (my dressform) and received nice comments.  The thing is, I am not sure about the style on my frame.  I am not sure if it because I added some extra to the sides just in case (I am fluctuating on my weight distribution again, going the right way this time) or if it was the fabric or the sleeve cut.  This is where I think my blog will help.

I wore the jacket to work and discovered two things that I need to do for the next version.  Sucker that I am, I am planning another one in a firmer fabric, with mods added and some held in reserve in case I still feel iffy about it on me.  First of all - for those who have a curvy shape, ADD BELT LOOPS.  Or stitch the belt to the s.s..  Otherwise it rides up or feels too lose.  Having a loose belt leads to the front opening, which I don't like under a belt.  So, I am adding buttons.  Probably only three (if I can find the match in the button box to that perfect button that jumped at me this morning at 7 am).

Here are the two shots I posted.  The green is not as light as pastel as shown here.  Blame poor lighting in the workshop.  It is the shape that I am unsure of.  I think this style does not do me any favours, although I seriously think fabric had something to do with it?

What do you think?

Mindy wearing the jacket.

Here is a "Seflie" of the jacket.  Again, sorry for the lighting.

Sunday, February 10, 2013

Banana Peels and Patterns

The Banana Story
Two summers ago I made a quick LBD for the funeral of my MIL.  I used Vogue 1100 and used a beautiful Armani wool from my dear friend, Darrell (Darrell Thomas Textiles.).  The dress went together extremley easy, with the standard FBA and some extra at the SS for a fuller skirt.  Later that year, while looking for a dress for Christmas I fell in love with a dress at Banana Republic.  I felt I could easily knock it off.  It had a slight Aline skirt with a banded waist in a wool look fabric and a satin bodice that had a twist located on the bias not the horizontal line.

I duly traced my trust Vogue 1100 and then hacked and slashed until I achieved the look I wanted.   Bodice Muslin #1 was OK, but needed work.  Bodice Muslin #2 worked better as I used a poly fabric that was slightly heavier than the charmeuse I had planned for.  I still did not like the results.  Too lightweight without going through the hassles of interfacing or interlining.  This Banana dress was starting to wear on my nerves. Enough slipping on the banana peel.  I gave up on the knock off bodice style and went back to the original pattern design and used the charmeuse.  The pattern recommended the fabric, so I felt confident it would work out.  I morphed on a sleeve from a pattern I like and have used before and then cut and basted away.  This is where I think the spirit of the Banana was haunting me.  I did not like the pleating in the silk, it did not seem to lie right, so I converted to soft gathers.  I kept in the bust dart and then added the skirt and waist band (made from a coord slubbed silk remnant from one of Darrell's Cat Rescue sales).  Put the dress on the form and almost cried.  It was that awful.

Overnight it sat and then I woke up, inspired by a new show on TLC (Something Borrowed Something New).  The premise is that a bride has to choose between a new RTW gown or a reworked and redesigned version of her mother's gown.  While watching rugby with the Pilot, I sat and ripped seams.  I peeled that Banana apart and started over.

The Aline skirt is now cut into the HP Moneypenny Trumpet Skirt. Knowing and accepting that I have added to my waistline and hips, I duly added to the seamlines.  This afternoon I will finish the edges, baste front and for fit and then draft a waist facing (will try to use the Banana Band).  Once I add the lining, voila - new skirt!

The bodice is a right off.  Using a silk charmeuse for a top did not work, IMO.  The fabric is too soft and looked way to pouffy on my body.  The tailored look of the Armani is what I wanted.  And the silk was not going to give me that.  An expensive lesson to learn as there is not enough in the leftovers to toss together anything except maybe a scarf..

Patterns
When I was working on this project, seeing it sink deeper into oblivion, my confidence in my skills and in my desire to continue plummeted.  I looked back over the past few years of sewing and realized that I have been progressing further into laziness.  As I revelled in the fact that there are patterns out there are that are designed on a sloper that is almost me, I stopped adjusting for me.

As I pulled out one of my Palmer Pletsch books, a slip of paper fell out.  It was from my first fit seminar, back almost 20 years ago in Halifax, when Patti introduced me to FBA's, broad and high round backs and forward shoulders.  All adjustment I needed and that she diagrammed out for me on a bodice sloper picture.  I cannot remember the last time that I performed any of those back adjustments.  Good enough had become my philosophy, but deep down I knew good enough was not sufficient to cut into the wools and silk suitings in the stash, let alone the Chanel sitting there.  working with the silk remnants made me want to work with the aging stash.  It is calling to me.  Remembering the weeks of fitting and adjusting it took to perfect the dupioni cocktail dress, the fun I had in the process.  I want that feeling back.

This all started because I needed clothes for a new job and had little time to sew what I wanted.  So I accepted RTW and good enough.  Not anymore.  I am worth more than good enough.  If I can't give 100% effort to myself, then who should I be giving it to?

I am going downstairs to ponder patterns for a new top to go with the skirt.  The one I was thinking of using I am going to toss.  It was a compromise that I am no longer willing to make.  Then I am going to work to the level of my ability and push beyond.  Because I. Am. Worth. It.

Wednesday, July 27, 2011

Happy Returns

Thanks for hanging in there over the past week of silence!  We got back into town two nights ago and are still catching up on sleep lost due to time zone shift and then there is the catch up at work after a week's unexpected absence.

First off, I DID manage to exercise while away. I took my TRX for self inflicted torture and set it up in the walk out under the BIL's back deck.  Nice and cool in the shade and those floor joists were definitely sturdy enough!  Top that off with an hour long brisk hike in the hills with the Pilot in tow and  making really good choices for food, I think I did great considering I had almost no control over where we ate and when!  What did you do over the past week?

The dress was finished onsite.  I had to finish hand stitching the hem and the lining to the zipper once I arrifved, but really that only took about 30 minutes to do while listening to all the chater going on around us.  I used Vogue 1100 and some wonderful stretch wool crepe from Darrell.  Lots of complements on the dress.  It was classy with a modern twist with the neckline treatment.  The fabric made all the difference in this one.  The wool didn't wrinkle, it was a perfect weight and the lycra made motion easier.  Unlike some reviewers, I didn't have any armhole issues, but that could be due to the FBA I always do changing the curveof the armhole.  I also adjusted the vertical pleats, lengthening them as well as widening them for a closer fit and shortened the V opening.  A funeral is not the place to flash the twins, especially when one is doing a reading at the Mass!

Having made this in wool, I do not think I would make it in charmeuse (which is the original reason for buying the pattern).  I think the fabric would be too light for the fit of the pattern and I don't think it would move as well on me, anyway.  It has been done by another reviewer who had great success, but for me, this is now my LBD.  Ellen would be proud of the handwork and that I honoured her by sewing the dress.

I have some of the wool left as I had bought enough to do a princess seamed dress.  Now I have to decide if I want to do a skirt or if I have enough to do a jacket to go with the LBD.  I don't think I have enough for a jacket, (and that would be too much black I think) but maybe I can make a snazzy vest/waistcoat?  Hmm .... time to go browsing for pattern ideas!

Friday, July 15, 2011

Daily Dose of Diva - Part 3

Just a short post today ...it was PJ bottoms day.  She decided to do shorts for summer out of another batik from MaryBeth.  She loves how soft it is!  The top will come later on, I think.  Tomorrow is her last day at camp, but not the last day sewing.  This was a great opportunity for her.  If she wants, I may sign her up for some of the weekend classes in the winter if Darrell runs any follow ups (like maybe a jeans course to go with all that great denim you have in stock???  What do you think about that idea, Darrell!  Great for the teens and tweens!).

It was TRX torture day.  It is getting easier each week.  The muscle memory is coming back.  I am able to do more for longer now on some of the harder moves.  I would be better if I did more at home with my own TRX, though.

The dress is ready to put together.  The lining is done as is the dress.  Tomorrow I have to finish.  I have run out of time.  I may leave the neckband off for expediency at this point.  Will see how things progress tomorrow.  I have only a half day of work, so I will be able to do more when I get home.  I also have to add a modesty panel to a tunic that was given to the Diva by a friend.  She can't wear it as is at this point.

I know that I just stated posting again, but I am giving fair warning that I may be intermittant over the next week.  We are going out of town as of Saturday for at least a week. I am unsure of what access I will have.

Stay sewing and start exercising ... See you soon.

Wednesday, July 13, 2011

Dose of Diva ... Part 2

First of all, a correction.  Last post I said I was pre-treating a wool gab. I mis-spoke.  It is a dress weight stretch wool crepe.  It is in the dryer now as my bed was too comfy this morning to get up early enough to toss it in.  I should be able to get at it to cut tonight as it is still early.

Now for the Daily Dose of Diva Part 2!

Diva finished her lined tote bag today.  There are two more pockets inside.  It looks great!  MB, you would approve of the use of the batik and LOVE the slightly heavier cotton she lined it with!  Today's project was a simple bib apron with a bound edge.  Nothing unusual except hat it was an exercise in patience and careful pinning and top stitching as she bound the entire edge and extended the edge into the ties and the neckband.  She did really well for all that!  Nice straight stitching and a cute little apron.  More of the batik gone, MB!  Tomorrow she is starting her PJ's in another cotton batik!  You, MB are a partner in her camp happiness this week.  Which is just what we need at this point.  Some good memories to look back on.  She is unsure if she wants to have pics taken or not, so I leave it to her.

Exercise - the bike ride was cancelled due to thunderstorms and the pressing need to get the dress done.  There is a function in the near future that I need it for, so I have some time issues to meet.  Tomorrow is TRX Thursday.  I will head to the Rec Centre a bit early and hit the treadmill for a bit prior to the class.  That will help me make up for today.
Friday's lunch will be a challenge menu wise.  We always bring in lunch on Friday's.  How to maintain the tradition without always going for salad?  The menu is Lebanese/Mediterranean, so I think I will try a tabouleh salad or something new like that.  I know I will like the shawarma and other meats, but I want to be a bit adventurous and healthy at the same time.

Short post tonight, life is progressing fast, so I need to get back at it!

Tuesday, July 12, 2011

Dose of Diva ... Part 1

First of all, exercise update:  Last week I accomplished my 3 one hour workouts.  Tuesday's was a brisk one hour walk with the Pilot.  Wednesday was a one hour bike ride of the walking route (done twice) with the Diva. Thursday was TRX torture Day.  Today, the Pilot and I walked a new route for another hour.  Tomorrow the Diva has already reminded me of the bike ride.  Then on to TRX again.  What have you done this week?

Now to the main topic - the daily dose of Draping Diva!  Welcome to the first in a 4 part series starring the Draping Diva herself!
Here is a photo of the Diva herself modelling the jean jacket she made last fall. She practiced slow sewing to the point of it almost becomming a UFO! By the time she finished it, the "jacket" had shortened into a crop style w/ 3/4 length sleeves! She is doing her best Charlie's Angel pose with one of the Pilot's toys.

Today she attended the first day of a Sewing Camp at store owned by my dear friend Darrell Thomas. 
Background - Since Darrell left Bank Street and moved to Little Italy, he has gained more space and added a dedicated classroom.  To that end, he decided to run a sewing camp over 4 days.  4 days of learning to sew.  What is not to love for a Junior Draping Diva?  Especially since she was gifted with some BEAUTIFUL batiks from my other dear friend MaryBeth when we met up in Toronto last month.  She now has a sewing machine of her own (My mother's old Singer), a small stash and now she has a sewing box with tools!  I decided that we will start building her "Hope Chest" with the sewing tools first! So, on the weekend we went to Darrell's and bought her the essentials so that we no longer have to share.

DAY 1 - She is the youngest in the camp by about 4 years.  The age ranges from her all the way up to the lone male university student.  The experience varies from her minimal experience to others that have none to some with more.  4 hours of sewing instruction.  What is not to love?

First project is a lined tote bag.  She had to measure, mark then cut and stitch.  She is so excited as she assembled the two side panels, two lined pockets, and the straps in class.  She came home and then finished the top stitching ont he straps even though it wasn't homework.  She was so excited that the machines at Darrell's are the same as Mine that she promptly asked if she can "practice" on my machine ... yup.  I sense a trend towards time sharing here ... Of course, this could be justification for a new machine for me :)  (I would be perfectly OK with delegating the Singer to buttonhole duty now that I have the proper attachments ... but I digress.  Back to Diva).  She is setting her alarm to get up in the summer.  To sew.  HOW COOL IS THAT??????

Tomorrow they finish the bag and then start building an apron that has bias binding (purchased for this time) then progress on to PJs on Thursday (really cool kimono style top to this Burda Kids pattern).

Projects attempted since last post: The Little Black Dress project
1. Neue Mode 22774 (no link found at this point, I may post pic, I may not see previous post) a princess sheath dress with a sweetheart neckline with a shaped front yoke inset
Status - on hold; it needs more fitting than I have time for.  All those body changes have made my TNT adjustments to be Terrible and Terrifying!  So, it is shelved for now until I have more time to get real finicky with it.
2. Vogue 1100 (the dress)
Status - in progress.  The muslin came out OK, the lining is cut and and basic fitting is complete. It is tweak time.  I need to add the vertical darts in (adding extra in the midriff area to shape the extra from the upper and lower adjustments).  Tomorrow is the final work on the lining.  Tomorrow before work I am preshrinking using the method from the blog Off the Cuff and then tomorrow night I will finish the lining and be (hopefully) able to cut the wool gab.

Tonight I took the night off as I was sewing late last night and the walk was later than planned.  Tomorrow I will get more done.

See you all tomorrow!  Remember ... get out and DO something so that you can SEW something!  Get the family involved ... who wouldn't love a guaranteed hour long walk with the Spouse/Partner twice a week?  I know, I have the luxury of built in childcare now that Rugby Boy is old enough, but you can get creative.  Swap walk times with a neighbour or fellow parent.  Get a rotating playgroup going where two or three sets of kids play while one of you goes for a run/walk.  Trade off works!

Wednesday, July 06, 2011

The Tide Needs to Turn

I am back from oblivion again. I know I promised pics of projects past. I have come to terms with the fact that sewing was losing it's fun factor. Taking photos at each important step for a review that I was making myself write and then post was taking too much of my time. So, those pics are not happening any time soon. I will discuss patterns as I would chat with you across my table as we shared either a glass or a cup (the contents of which will depend highly upon whether or not I like the project we are discussing)!

I am too busy to do more. Since December last, I switched to a full time job but did not slow down on my other commitments. My sewing time is limited and precious to me. I want to maximize machine time when I can.

The biggest competition for my time right now is me. I have, over the past year put back on the inches and pounds I had lost. I let work and family become an excuse to not take care of me. The result is that the Doc has told me to drop 20-30 pounds. So, that means one hour of exercise a minimim of four times a week. So, the Pilot's workout needs don't mqtch mine so we need to do them mostly apart. Last night was a one hour brisk walk. Next time we take the uphill route as our first one was too easy. Tonight Diva and I did the same route TWICE on our bikes. She wants to do it each week. Tomorrow night I take a TRX class at a city gym. Google that if you want a new and challenging work out!! My goal is to exercise in the week ans then I can sew on the weekends.

The tide has started to turn. I am charting a new course. Does anybody want to join me? I am going to try to do short posts each night with my workouts ...
Let me know if you are going to join my journey. We can swim together.

Wednesday, October 20, 2010

Draping Diva!

That is her new name!  Monkey Girl is now the Draping Diva.  Three times since the last post I have gone down into the Sewing Room and found a length of fabric (usually my bamboo) wrapped, pleated and pinned in place on Mindy.  Don't know when she does it, although I suspect it is done when I think she is watching TV or playing on the family Wii.  Sometimes there is a note pinned to Mindy asking if she can use the fabric for her design (THAT WAS FOR THE OFF LIMITS BAMBOO!) or she then will join me and ask if the design is something she can wear.  Now seeing as she is draping on a form that is my size and bust and that she has not yet shown her potential for needing fitting, it is hard to tell.  But she loves to play with the fabrics, so I let her do so.  I have warned her off certain fabrics as they do not survive random pinning and being left to hang on Mindy, especially when some of it inevitably ends up being on the bias!  I need to thank Darrell for this new talent of hers.  you see, he has numerous forms throughout his shop with fabric artistically draped to showcase the fabrics to their best potential.  She fell in love with the idea when we last visited.  Makes me want to hunt down a cheap form for her to play with until she grows into mine.  Christmas is coming ...

So design divas!  I need your help and I need it fast! I have an important meeting next week with an VP of a Bank.  I need something appropriate to wear ... I want to wear a dress if I can pull it off in the next week (so the Claire Schaeffer mock wrap couture pattern is out due to time).  I have some suiting intended for a shirtdress, but again, time is a factor.  So, it will have to be either a sheath or an empire style, unless I do a surplice knit.  I have this fabric from Darrell that I bought with the intention of using it for one of the HP Three Graces tops (the cowl was the preferred), but now I am thinking of it as a dress.  Simple in doing, but it is the fabric that worries me.

It is an bias printed argyle pattern in grey, blue and black with silver thread shot through. The cowl drapes nicely according to Draping diva and Mindya doesn't look too bad in it full length, the issue is whether I will.  I want to push my envelope a bit beyond the obvious argyle top or twin set, but is a dress really the way to go?  My figure is not the most willowy and I am now in my 40's, so age appropriate is important.  I do so want to leave a good impression ...

Idea #2 was to take the top with the cross over front (the Grecian one) and use black for the cross overs and the argyle for the cowl center piece, but that would take soem creative drafting of the pattern pieces to balance the bottom off.  This really appeals to me as it will be most unique but still not be too much argyle as it would only be on the cowl and the center front.  What fabric I would use on the back is open for debate: black or full argyle?  What say you?