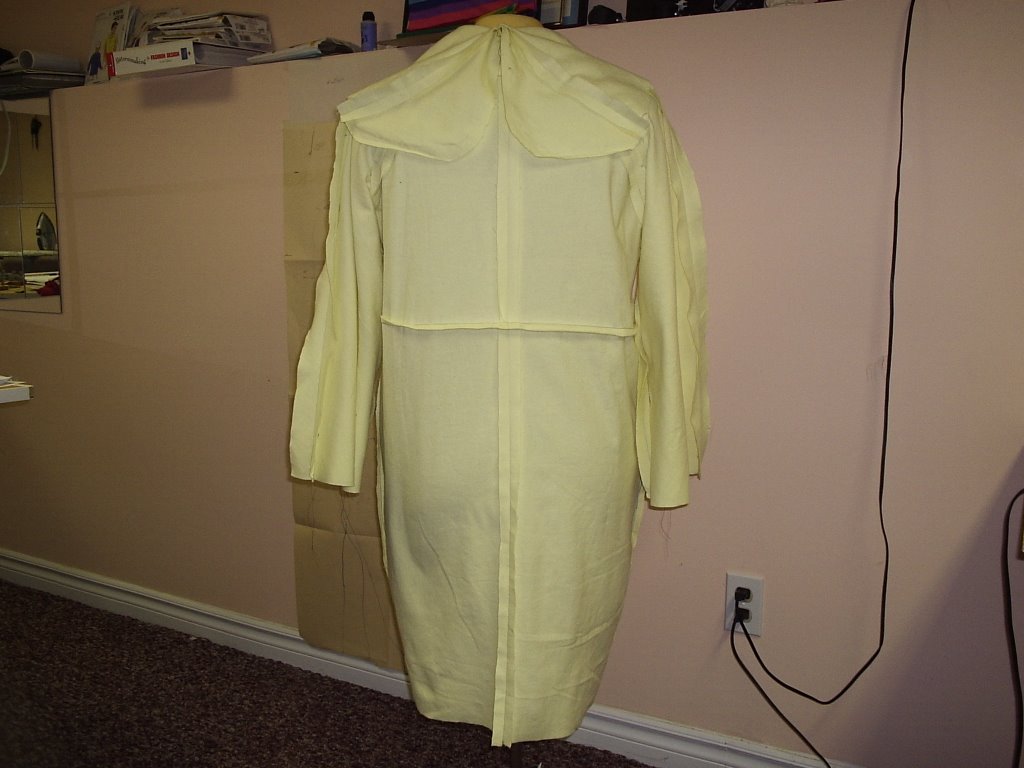
Showing posts with label Cherry Blossom Coat. Show all posts

Friday, March 02, 2007

Spring is coming ... somewhere!

Earlier in the week the Monkey asked me to BBQ hot dogs for lunch. As it was a wonderfully sunny day and the deck had been cleared of snow by the sun, I went outside. I even opened the deck umbrella for a bit to provide some shade for the kitchen as it was really warming up in there. It was a huge surprise when a fly took wing from underneath the umbrella. IT had been hibernating, I guess along with a half dozen lady bugs. So, despite the fact that March definitely came in like a Lion this year, spring is coming! I am now on robin watch! When I see the first one I will know spring has arrived!

I went back to the sewing room this morning. Before I took that last hiatus, I had trimmed and then repinned the Dragon pockets, both front and back. I then abandoned the sewing room for a couple of days that magically turned into a couple of weeks. Some of it was for medical reasons, but now there are no more excuses. I only have the cargo pocket to add and the inseams to stitch before doing the waistband, so they are almost done. There shouldn't be any more tweaking until I get the lighter weight fabric from the EFQ (ordered a week before Lent began). So, hoping that Monkey will let me finish these this aft, I will have them done for the Pilot's arrival tomorrow noon.

In light of the spring like atmosphere, I have some worries about the Cherry Blossom coat. I have been staring at it, wondering why it doesn't appeal to me. I am of the opinion that it really is not a flattering coat on me right now. I wonder if I made it too large? IT is supposed to be a loose fitting design, so I wonder if I made it too big? Seeing as I no longer need the warmth factor, I am going to rip out the lining and replace it with a layer without any fleece. Maybe a layer of flannel instead. I have more lining, although it is not silk. I also think I will take the seams in at the s.s. and armscye to see what that will do. And shorten it some more. So, once the Dragon is domesticated, I will do my round of rip stitching and then pin it all and post for help. I have always been lucky that the majority of my readers have the knowledge and tact to give me what I need to hear and to provide good solutions. I really don't want to give up on this.

Last week, Diva Phyllis posted a shot of her wearing her HP Sportive Suit Skirt. While I love the skirt and have it in my to do list for Spring, I fell head over heels in lust for her blouse! I commented on it and Phyllis was nice enough to brainstorm the construction of it for me. She even found a pattern for me/us. I went to the local Fabricland yesterday and bough the pattern. And (mea culpa) some fabric to go with it. The colours in this fabric will lend itself to many items in my Closet, so I think it will be a nice dressy blouse for spring.

I also picked up this little gem of a top. I made a formal top a few years back that had similar lines to view D. This photo is not flattering as I see that the Twins are a bit droopy and hindsight being perfect< I should have widened the bodice piece a smidge ... but oh well, it was good for the price of the silk! The point is, I like the wrap over styling of the bodice, but was uncomfortable with the lie of the crossover. This new pattern eliminates that problem by having an under layer to the wrap. Now, I just have to choose the right fabric for this top. I have a Pucci type print that I think would hide the wrap detailing, so that is out. Same with the lace. That leaves me with powerdry and some Sophia knits that are coming with that box from Ressy. And some summer weight jersey's that are too light for Canada's early spring. So, do I make it in the caramel silkweight powerdry? Or the white cotton lycra that I was going to use for the twisted turtleneck? I think I have enough for both, but do I need 2 white tops?

I think I have finally found a use for that red gabardine that has been harrassing me so loudly! I think it will become a HP Sportive Suit jacket. I have a nice summer floral print with a matching red in it that would do well in the skirt of the suit. Or do I have it backwards ... should the print go on the top and the solid on the bottom? I can never get that straight! Anyway, I think that the print would make a nice spring/summer skirt as it is a nice weight cotton with some lycra to it. A jacket would not be right for this fabric, but I could sew it up in this zip front blouse. I know this is a flattering look for me, so it would be great for this. Maybe with the red skirt? I am determined to use that red ... I have to purge it from the stash this spring!

Anyway ... enough time typing for now. I need to get back to finishing off the Dragon so that I can get to that coat!

Sunday, January 14, 2007

To do list ...

Well, so far I have managed to get the Sportive Suit jacket and the Lacy Wrap Cardigan finished. The Cherry Blossom Coat only needs to be hemmed. Last night I was too tired to do it. But I may get at it tonight as I watch television.

I have one more job interview to go tomorrow afternoon, and will wear the cardigan over a silk knit mock Turtle and my Jalie pants. If I get the position, I will have to sew up a storm to provide myself with a wardrobe for a casual workplace. So, what to do next?

As I am managing to lose some weight, I need to either alter pants or make new ones. I have lots of fabrics that are suitable for this work environment, so I can easily make new ones. I think the next pair will be the HP Dragon Cargo Pants (minus the dragon embroidery on the leg) in a nice wool gabardine from fabricmart. I may also make up another pair of Jalie pants in black brushed twill. I have some brown ottoman (like an unbrushed twill) from Ressy that may become the Everyday Pants. Depends on how it washes up.

For tops, I need a number of them. The first one will be a twist top with a cut on sleeve from WOF in a white cotton interlock. Followed closely by the twist Turtleneck proposed by Diva Phyllis. After that I need to make some shirts and blouses for myself. I have potentially only 2 weeks to get myself the beginnings of a working wardrobe. First one that didn't involve a uniform ... and I get to sew up a storm while the Pilot is away during the week.

Wednesday, January 10, 2007

Call backs and cuffs ....

Thanks for all the good wishes regarding the interview yesterday. I got a phone call tonight to schedule the second interview with the rest of the management team of the Fitness Centre. Looks like Friday I will have that second interview. What am I going to throw together now that I have an extra night to plan? Can't wear the same jacket twice in one week. At least, not the same fabric one ... I will have to examine the pattern file and see what I have that will be fast. I have a Silhouette pattern for a jacket that I can do easily. They usually fit without any alterations. Or, I pull out the HP Cardigan resting in the wait pile. I can put together a wearable muslin with fabric in the stash. I seem to have good luck with the GG sizing, so let's see if it works as well as the others!

For some reason I can't get the cuffs right on this Cherry Blossom coat. After talking with Kay Y. and Mary Beth today, I think that the problem is one of my own making. The problem is that the sleeve, without the cuff, is the perfect length for me. When I add the cuff, it needs folding back to lie correctly. This happened in the muslin as well, and as the fold back equalled the cuff width perfectly, I assumed that meant the cuff and the contrast panel would be folded back onto the sleeve. Therein lies my problem. When I stitch the contrast cuff to the cuff facing and then fold it back, I have way too many layers at the hemline. The problem is, the instructions are a bit dodgy so I have been puzzling and ripping for 2 days to figure this out.

It wasn't until after I had coffee with Kay this a.m. that I came to the conclusion that my assumption is most likely faulty. I think the fold was sheer coincidence and the extra length is due to the bias cut of the jacket sleeves. So, I sent Trudy an e-mail to see if I am right before I cut on the line that I have marked on the sleeve. I am so close to having this coat done that I am frustrated beyond belief! I can't carry on until I know ... and once cut, I can't put it back!

I have commented before that the HP patterns always assume some skill and should not be taken lightly. But (how I hate that word ...) this pattern's instructions are muddled to say the least. I couldn't figure the sequence given for construction. It was not logical to say the least. So, I read them to look for unique things that I need to be aware of and then I went on my own. Which I tend to do more often as I progress in my sewing. I usually follow the same routine: assemble the fronts, the backs, attach the sleeves, collars and cuffs. Repeat for the lining and then take a deep breath and hope that I have the lining done right and that I won't see s.a. after I attach the lining. Yup, I saw the s.a. last night and had to frog stitch the lining and redo it so that the lining was silk out after I bag it as opposed to fleece out! That is one reason why I don't call myself an advanced sewer. Until I can do that easily, I am staying intermediate! Another reason to make another jacket tonight and tomorrow!

Cross your fingers on Friday and stay tuned!

Tuesday, January 09, 2007

Late Night Creations

Last night I burned a bit of midnight oil trying to throw something to wear to last minute job interview. Diva MB and I were talking and we agreed that the HP Sportive Skirt Suit Jacket would be perfect for the occasion as the interview was for an admin job at a local fitness centre. She didn't think I was serious when I mused about whether it would be possible to put it together in two hours or less. If it was possible, I had a new jacket for the interview. If not, I would at least have
a muslin done for when I am ready to cut the stretch velvet assigned to it from the stash. Win win, right?

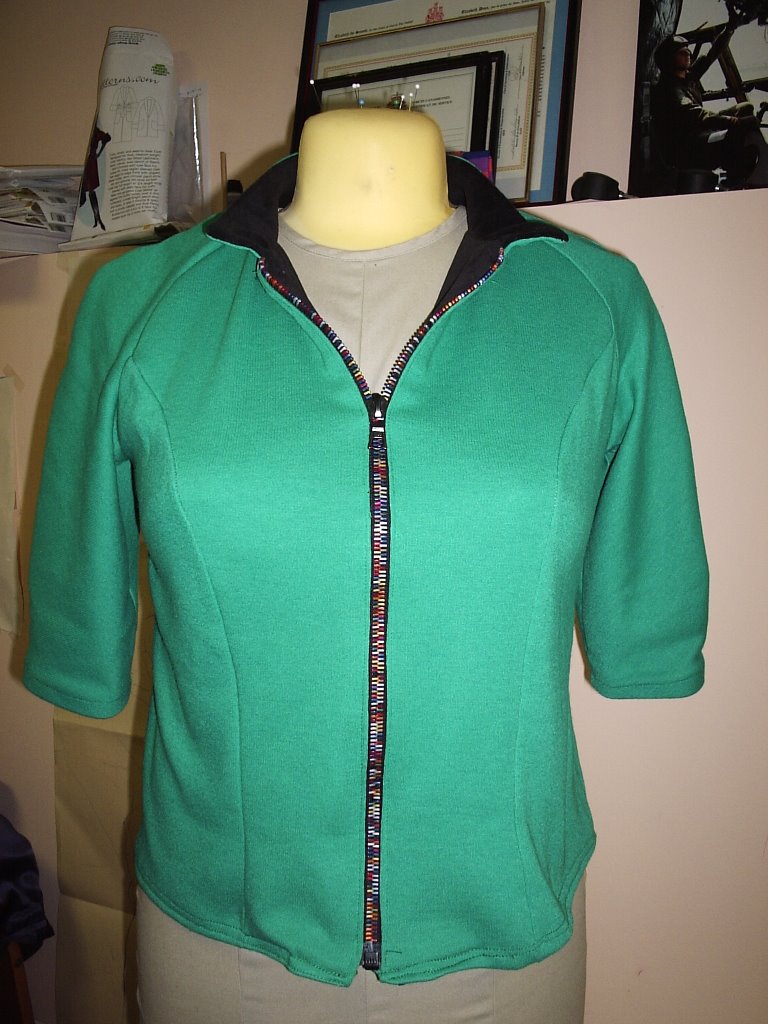
The pattern has the same basic design as the HP Cherry Blossom coat currently co-habiting the workshop. Two piece raglan sleeves cut on the bias give the sleeves and the shoulder a very nice line. They curve so nicely over my sloped shoulders and flare out at the wrist. At least they would have, had I enough fabric in the chosen piece to do a full length sleeve! I was short fabric, so I shortened the sleeves to elbow length. I omitted the lining as speed was the goal here, and this was intended to be a tres casual jacket anyway. I like the shorter length sleeve. It gives a bit of a vintage feel to the jacket and also allows me to wear this jacket in the warmer weather as well. I will use the full length sleeve on the velvet as I don't usually wear black stretch velvet in warmer weather! I did not use the hoodie version of this jacket as I am not a hood person unless it is outerwear. Living in a climate where you usually have to wear a parka with a hood, having another hood underneath is not comfortable to me.

As this pattern is in the older sizing system, you should know that I do NOT sew the much complained about Slinky size range. I am very definitely a Glamour Girl. The princess seaming is very generously cut in the side pieces, making a flattering front for somebody with the shape to fit them! I cut out a 16, larger than my usual 14 as I wanted to be able to take in seams rather than have to add. As this was a (hopefully) fast muslin, I wanted to see if I could get away without my usual FBA. What are the chances, considering I usually have to add 2-3" across the front for the Girls? I held my breath and cut the 16 in the pattern. I pinned it to Mindy and it appeared like it would work even though I did not use a stretch fabric. So, I took another deep breath (and a huge sip of caffeine) and cut the fabric.

The fit was divine! It did not need any alterations at all. It has enough ease that I could easily wear a sweater underneath (assuming I had LS), so I could probably use 1" s.a. to make a closer fit next time, especially since I am going to use a stretch velvet. This makes me sad that HP discontinued the older range of sizes, but considering the large number of problems with the Slinky range, I can see why they did it. I wonder if the GG is the basis from which they graded to the Slinky and Curvy ranges?


I used the serger for this entire project, except for the facings and applying the collar and zipper. I used a Riri zipper that I bought from Londa's. Originally intended for a denim jacket, the zipper has multi-coloured teeth. This zipper really makes the jacket, I think. The colours really pop against the green in a way that I don't think they would have against the denim. Diva Ann once mentionned that the choice of a closure can drastically affect the finished garment. I have to agree with this. This zipper really jazzes this green jacket up.

I am most definitely sewing this again after the Cherry Blossom coat is done later tonight. I see this in the stretch velvet and even in a wool or denim with some piping on the raglan seaming. This pattern has replaced the McCall's pattern languishing in the stash in a similar style but for the sleeves. After the velvet is done, I see making a pair of pants to go with them. I have some nice red gabardine that I may finally get the courage up to sew into pants. Then I just need the guts to wear red pants! Being the product of a conservative mother, the thought of red pants has me doing a bit of an irrational twitch ... but that is another post altogether!

Friday, January 05, 2007

How NOT to plan Bound buttonholes (or why not to clean the cutting table so fast!)

First of all, my shop is not usually a mess. Yes, I have a "muslin" pile under the cutting table. I have bags of trims and ribbing in the closet on the floor but only because I have yet to determine where to hang them in the shop's new configuration. The work tables are clear but for the projects on hand. But this week, I made a big boo boo. I cleaned the fabric scraps from the Cherry Blossom coat off the table and cut out the contrast cuffs form the last remnant. I then tossed the scraps. Totally forgetting that I was planning bound buttonholes for the coat. Now I have no fabric with which to do them.

I have no more of the wool and do not want to delay any longer in getting this done. So, I am off to the local fabric chain (not Darrell's, that comes on Wednesday) to see what I can find for the buttonholes. Maybe I can get some nice faux suede in navy, brown, or black. Good thing I have a GC from Christmas ...

Wednesday, December 20, 2006

Happy 2007!!!

It is now 2007! We had a quiet end to our year. The younger monkey stayed up till 9:00 pm and watched a Polly Pocket movie. The elder got to stay up till midnight, watching Jurassic Park. Even though it was a hard thing to watch him struggle to stay up, he had done his part in napping this afternoon and agreeing to sleep in, so we let him hang in there and then carried him to bed after the ball went down in Times Square. While the movies were on, I went into the shop to sew ...

Last week, I had cut with an extra 5/8" s.a. and plan on sewing a full 1". I am not going to trim in back except in the curved areas. Even though I am lining this coat, the wool is a bit ravelly, so I am going to serge the edges of the wool. I am also going to machine baste the fleece to the silk at 1/4" from the edge. I could not fit the bias sleeves in the jacket I was going to recycle. So, that jacket is going to stay in the back of the cupboard for a while. That way I can use it for other things if I need it. I managed to find enough fleece in the stash. It isn't a microfleece, but it is a 100 wt, so I think it will be OK.

I managed to baste the fleece to the silk and do the darts on the front lining. I have the back pleats pinned, but want to compare to the facing before I sew as there are no markings. The sleeves are stitched to the fronts and back and the pockets are assembled, flipped, and slipstitched. Ready to attach to the coat tomorrow after I serge the edges of the wool. I know that it will all be hidden by the lining, but I really am trying to raise my standards a bit on this project. I am taking my time and relishing working with these fabrics ...

There has been much said about the instructions in HP patterns. I am not quite intermediate, but I do have a fair amount of knowledge under my belt. The instructions state that you have to know how to sew a shawl collar but do not elaborate further. To me, that assumes that you know to reinforce the corner with interfacing and then staytitch before clipping into the corner. The only other observation is regarding some missing hash marks for matching facing pieces, but as I tend not to use them anyway, I am not too upset. The muslins went together fine without them. As others have mentioned, Trudy and Jeremy assume that you have a certain amount of either general knowledge or a good reference book. For instance, the patch pockets are lined and faced. you are told to leave a gap in the seam joining the facing to the lining and then to stitch to the pocket. You are not told to trim, clip curves or corners or flip the pocket. Common sense tells you this. I really see myself growing in confidence as I sew HP projects as I am better able to see what lies ahead and expand my skills sets. For me, sewing is a journey in relaxation. The fact that I get a wonderful piece of clothing at the end is even better!

Well, I am off to bed. The New Year is here and I have one more wonderful week with the Pilot before he heads back to school. Lots of family time and there may even be a date in there as well ... we won $100 on the lottery Friday night. That paid for pizza and donairs for supper tonight and the movies after. We may be able to get a babysitter out of it as well seeing as we have movie passes! Rather than making any resolutions, I am counting my blessings and enjoying what I have. May you do the same in the rest of this year!

After the muslins ...

Remember that red silk that wasn't? Turns out it was black and was in a totally different location than I was looking. My sleeve linings are going to be blue in the front and black in the back. Love stash scraps, don't you?

I managed to cut out the rest of the coat and the interfacing as well. I can now sit and start sewing. It will be great to be off my foot for a while. I had enough of the blue to get the entire coat cut out with the brown for the pocket and collar facings. I am going to self line the pocket with the brown wool. The Obi belt seemed really wide on me, so I cut the width back in half. I don't think I am tall enough to carry a belt that wide, although really did emphasize the waist nicely...

I hope to have some major progress to post tomorrow. The Pilot comes home tomorrow, a whole day early! Gives me butterflies even though he was just home last week. Knowing that we have him for 2 whole weeks makes this even better. That is present enough! I am lucky that he is only up the road 5 hours and not deployed, though. After 18 years of trying, he has not yet gone. I know it will come eventually. Maybe this is my year in training? I am counting my blessings ...

It hit me today that there are 5 days till Christmas and I have yet to start the little monkey's skirt, big monkey's top and anything for me (not counting the coat). The Pilot's shirt, we have agreed, can wait for Darrell. I was going to make the Trumpet skirt, but heels and I won't mix for another couple of weeks, I think. I thought I would start the HP Dragon pants and throw together a twist top ... depends on how fast the rest comes together, I think. Well, I have pulled off more in less time, so I guess I just have to get at it! Supper first then time with the kids. Once they are in bed, away I go ...

Tuesday, December 19, 2006

Shirts ... again!

Well, in keeping with a holiday tradition in the Newman household, I had the Pilot try on a muslin for a shirt. And once again, I have a nice fit in the back and the shoulders are an easy fix, but there is so much fluff in the front and for some reason it doesn't want to lie straight. I have decided to just stop trying to fix the KS pattern. I am going to start the muslin on the Vogue pattern instead. I hope to have that muslin done by Monday. Then I can make an appointment with Darrell for a fitting session. Maybe he can figure this out ...


I found some wonderful stretch velvet on eBay last week. A wonderful melange of browns and gold that the photo does not do justice! This will become a holiday dress and skirt for the little monkey and the HP Chilled Out Sweatsuit tunic top. I have some more of the velvet coming in a red floral pattern on black. I am not sure what that will become yet, but I am sure the little Monkey will claim some for herself. She was wandering around the family room with the fabric draped around her like a toga for a while. She is now sitting with an arm on the box it came in. I can see that this will be a fast project to sew and I will have to do my best to keep her out of it before Mass this weekend!

In the planning stage of the HP coat, I asked for and received plenty of advice regarding insulation and linings. People from all across the continent gave me help, but in the end, I needed somebody who is in the same climate as me to help out. So, I spoke to Kay, a fellow sewer in Ottawa about coats and thermal layers for our city. She just reviewed a wonderful coat on Pattern Review. I needed some advice about whether or not to actually sew in the MM thermal layer in my coat. I have it cut out and will stitch it together, but I will hold off actually putting it in between the lining and the wool. If I really need it, I will fashion it as an under vest layer. I like how Kay managed to add a front zipper to her coat and am going to shamelessly copy her closure ideas.

I managed the past two days without crutches. This morning, I managed to get a lot of shopping and driving done. I also managed to do some wrapping this while the kids were at school. The downside is that I was standing on carpeted concrete wihtou slippers. My foot is now very sore. I needed to put it up this afternoon for a while. Time to put movies on for the kids and rest! I picked up "The Devil Wears Prada" this afternoon to cut and sew by tonight. But first I have to take some Ibuprofen ... and maybe order in Chinese for supper!

Saturday, December 16, 2006

How not to get your holiday sewing done on time ...

Well, all my plans for sewing this season have fallen through the cracks. OK, fallen down the stairs ... the last one step to be specific. I am in a golden position to nothing but sewing as I have a bad foot sprain, but I can't do any standing for any period of time. There lies the problem. I have nothing cut out. Lots of time to sew, but nothing cut! No new patterns to study, no new books/mags to read (the spousal Santa should have picked up the new WOF for me, so I don't dare go pick it up. Not that I could as I can't drive right now! ARGH!!!

I think I am going to brave it for a bit anyway as I am going nuts trying to be still and keep the foot elevated. This could be a golden opportunity to get some of those Silhouette patterns done up as they usually don't need any FBA. And maybe the kids' clothes ... Elder monkey wants some of those tops that have the mock double sleeve with (gasp) a collar and younger monkey needs a new skirt to go with the cutie lace top I bought her for Christmas Day Mass. I have some black velour I can do up for that ... maybe with some red accents. I could add some godets for a really twirly skirt. Maybe I should look through my OD back issues to see what I can find. Then there are those T's for the Pilot; those can be cut and produce in a production line.

This is much better. I was dreading the fact that I can't work on the coat as that would take too much standing to cut out all at once and there would be no sewing in between. I think what I have to do is organize and multi task. I can't work on the coat until the lining is done. Ergo, I cut the lining and interfacing first with a top or two as well. When I need to elevate, I sew. When I can stand for a short period, cut tops.

The coat can be cut quickly once the lining and interlining is put together. I have enough of the main colour to use self fabric for the sleeve interlining as I don't want to use my thermal layer there. It would be too bulky and take away from the bias drape of the sleeves. I can also cut out some swatches and practice bound buttonholes on the wool. If I am satisfied with the results, I can go ahead with those. IF not, then I will do button loops and maybe hide a zipper in the overlap. I also remembered that I have some more silk charmeuse in the stash. I have some wonderful Christmas red left from a formal I made a couple of years ago. Whether or not it will be enough to line the bias sleeves, I am not sure. Will have to go digging in the cedar chest. If not, then maybe I can use it for the facings, freeing up more of the navy for the sleeves and body.

The Pilot and the monkeys are being so wonderful right now. They did the groceries this morning while I was getting my hair done. The elder monkey actually volunteered to walk his sister to school yesterday. Huge advance for him to actually volunteer to miss some playground time and be seen socially in public with her. I was so proud of him, making his own lunch and her breakfast as well. He even drew her bath for me so that I would not have to do the stairs last night as the Pilot had not arrived home yet. Whatever other things they do, as monkeys tend to go crazy quite often this time of year, I have been blessed with wonderful children. Their behaviour reinforces to me that the Pilot and I are raising them well. I think that is the best present I could ever receive ...(the gingerbread tree brought home from school by the younger monkey as a get well gift is a close second)!

The new Hot Patterns baby arrived this week. Two monkeys in their home now ... may they be as happy and blessed as I feel right now. Congratulations, Trudy, Jeremy and Gideon!

POST SCRIPT

A trip into the cedar chest revealed only a beaded silk remnant, no charmeuse. So, I found some Ambience lining that was bought for some floral chiffon and will use that for the sleeves instead. Another find was some Malden Mills Windbloc microfleece. There was just enough to use as a thin thermal layer for the body of the coat. If I cannabilize a jacket that I no longer wear, I can have more for the sleeves. Having a thin layer of windbloc will be very helpful. So, tomorrow, I get to recycle fabric and a coat length zipper while I elevate my foot. When I finished digging, I managed to stand long enough to get the lining and thermal layer cut out for the body. I have enough charmeuse to cut the neckline facings as well. Tomorrow, while standing, I will cut those and the contrast neck facing and interface.

Friday, December 01, 2006

Linings and facings Part 1

I needed to take some time away from the coat yesterday. I had added an extra 5/8" s.a. to account for the interlining and sewed at only 5/8". This made the coat very large and bulky even over a heavy sweater and a length of the lining fabric underneath. So, I went back and stitched a larger s.a. to make a total of 1" from the cut line on one side of the muslin. This still gives me an extra 1/2" per seam so I think I will have more than enough room now without looking like I am wearing a tent. When I sew the re-stitched side, I was much happier. I stitched the lining/facings the same way, at 1". so far so good.

I have mentioned before that there are lots of pieces to the lining for this coat. Rather than just a front, back and sleeve lining, there are also back neck facing, front and back shoulder facings and the 2 piece front facing that is also the shawl collar/hood. I have the pieces all cut out and have the facings put together and am now working on the lining. The facing pieces had no connecting marks, but they are pretty obvious since this is a raglan sleeve, matching the proper angles was easy.

I have redrafted the hood again. I am still not happy with it. Part of it is also because I did not extend the CB neckline seam enough to account for the extra s.a. I added at the 2 piece sleeves and the CB. I was forging along until I realized that I had forgotten to add the extra s.a. from the sleeve seams (cerebral rot moment ... otherwise known as sewing till almost midnight). If this hood draft does not work, I will draft a separate hood that will button onto the coat body. Or, here's a novel thought - wear a hat!

As it is now the weekend, I am not gong to do much on the coat. The Pilot is home and we are taking the Monkeys to a local Museum that we have not yet been to. Then Sunday afternoon is family portrait time followed too quickly by the Pilot leaving again.

Another thing that has me a bit bummed out is that I lost the auction on eBay for that serger. I had it up till the final minute when somebody else came in and swooped it out from under me. There was no time to counterbid. I am so disappointed. I had my hopes up when there was no activity against my bid for over a full 24 hours. Oh well, that's life on eBay, right? Make your bid and take your chances ... I guess this may be a sign that I should wait and keep saving and buy new, right? After all, I have dealers for all the brands here, all it will take is me deciding which one I want/afford. And how long I am willing to wait to get there!

Wednesday, November 29, 2006

Muslin #2

Well, the second muslin is 98% together. I miscalculated something. When reviewing the Threads articles on adding warmth and inter-linings to coats, they both recommended using a size up in the coat to allow for the extra layer. I had not done that, so I cut out the wafflecloth with extra 5/8" s.a. and sewed a normal 5/8". Sounds normal enough, except that I forgot to add to the back neck seam on the hood/collar. So, I can't attach the neck to the coat. The hood is still not quite right, either so I have to play with that a bit more yet. Otherwise, it looks much better and fits well over a sweater with lots of ease, so it should fit well over the lining and thermal layer. I am going to let the coat hang so that the bias will stretch before I do anything else to that. I added an FBA of 1" and then removed the dart. In the lining, I rotated out the dart into the front seamline as there is an existing dart there. Now it is a bigger one!

I am going to put together a muslin of the lining tonight as I want to see how it all goes together. This will also allow me to try out my latest hood fix on the front facing. I have some poly from the stash to do that up. I am taking a break now and will get back at it after the monkeys are in bed. I want to get lots done over the next day or so as the Pilot comes home for the weekend again. We are having a family photo taken this weekend. A friend is a pro photographer and he is doing this as a favour to me. I will have to make him something special. As he is another Scout leader, maybe I can make him a campfire blanket/poncho. Or one for his son ... he won't take any $ for this. As a freelancer he shoudl get something for his time, don't you think?

Tuesday, November 28, 2006

Back at it ...

Well, the weekend is over and the Pilot has gone away again for another week. The dining room is 3/4 painted and I managed to get to the shop for an hour tonight. I have transferred the FBA and hood changes to all the pattern pieces. I am going to cut one more muslin so that I am sure of the fixes prior to cutting the cashmere. I have some waffle cloth that I had on the classifieds, but since there are no takers, I am going to use that. If it fits well enough, I have a very fashionable hooded HP bathrobe! I "tried on" the windbloc liner fabric today and it was lighter in weight than I thought which will work out well, I think.

I was looking through some back issues of Threads tonight and found an article on shawl collars. With respect to interfacings, there were 2 options, soft or tailored. The tailored option was favoured for coats. For that option, I can either hand baste in hair canvas or use layered fusible interfacing and roll tape. Since I don't have any hair canvas, guess I am using the fusible. No roll tape, though, do I really need it? My thought process is that since I am adding a hood and will have the collar slightly raised when wearing the hood, I don't necessarily need a definite roll line (not there is one marked on the pattern anyway ... more on patterns below).

I also Ann's article on welt pockets once again. I used her method on my Jalie jean jacket and loved it! It was so easy to follow and the results were so great. Again, my brain is working overtime, but isn't a bound buttonhole the same as a welt pocket without the pocket bag? Can I use the same method for my buttonholes? Something to try out on scraps before I do anything for the buttonholes.

Now, on to a general rant about patterns and people's expectations. I refer to myself as a novice sewer. As I have not yet sewn a tailored jacket and there are numerous techniques I have yet to learn, I would not call myself advanced in skill. What amazes me is that there are people out there who call themselves "advanced beginner" or "intermediate" and yet they publicly froth over having to add seam allowances, or they rant about small inconsitancies in pattern markings. On the HP design I am working on now, the markings are lighter in colour than the rest of the lines. There is no roll line marked for the shawl collar. Am I complaining? No. I don't need/expect to be handed it all on a silver platter. Sewing is an escape for me. I often call it a mindless exercise because I am able to completely dump all that is going on in my life and just focus on the project at hand. Does that mean that I don't have to think? Not on your life. Do I expect the detail of the pattern to be commensurate with the price of the pattern? No. I recognize that the reason indie patterns are more expensive is a scale issue. They limit the numbers so they can keep costs down. Since when is quality a function of cost?

Sorry for the rant, but I was disturbed by something I saw today and am amazed at the things some people can write. I am not going to say anything more as I don't want to give anymore time to this. I have just been holding this all in for a long time and today, I can't do it anymore. So, I am off to have a glass of milk and go to bed to read about the linings once more before I start to cut. Tomorrow is a day for muslin #2.

PS. Cross your fingers, I am bidding on a new serger on eBay. It is a lovely little machine that somebody I respect highly also owns. Two more days to go ... I am going a bit beyond my comfort zone in bidding, but this little beastie will be so worth it! A nice early Christmas present if it happens!

Thursday, November 23, 2006

muslin fixes

So I realized last night that I had forgotten to mark the CF on the muslin. So, I may actually have had the front pinned wrong. So, I have marked off the CF and repinned to see what it is like after a night hanging as well. Turns out that I had way over pinned the overlap! I filled out one of the sleeves with some batting I had in the stash to get a better idea of how they hang. The other thing I noticed last night was that there is some shaping to the side seams that is apparent in the flannel but not in the drawings. There is a definite curve to the hip line that carries down to the hemline that I took out. I like a straighter line to coats.

I agree with Diva Mary Beth, the coat sure seemed to be asking for a French Dart, so I pinned one out. I also have replaced the wedge I put in the hood with a larger one to make that fit better as well. Here is the muslin with the back dart taken out, a French dart added to the right side only. Major difference to the front! I figure I have to add about 1" in length and probably the same on width to make this work. I am going to cut some strips of fabric and stitch it on to see if I am right rather than re-cut the front. I think that the fullness from the dart down to the hemline is due to design or is something else I have to fix. I will have to think on that for a bit.

The back and armscye actually lie better now that the front dart is pinned in and the horizontal back dart is removed. I thought you had to adjust the back before the bust ... but that just seemed to cause me more problems. Thanks Mary Beth, once again!

I want to try it on over a larger sweater tonight (this is where I regret using flannel as the muslin ... major cling factor!). After that I will see how it looks before I make the changes to the pattern. I will do a bit more after the monkeys are in bed and then call it a night.

As far as initial imresssions go for this pattern, it has gone together easily enough so far. I have not really used the instructions yet as the design has no major challenges to it. However, I have been using the coat pieces for the muslin, though as the lining and facing pieces are too numerous for a muslin. I like my muslins fast and easy to throw together! Once I get this fit as best as I can, I will tackle the many inside pieces. That is for after the weekend! The Pilot comes home for the weekend and I don't plan on spending it in the workshop!

Wednesday, November 22, 2006

HP Cherry Blossom Coat muslin #1

The first muslin is done. I made no alterations for fit but did make some style changes, the biggest being the addition of a cut on hood to the shawl collar.
I drafted what I thought would be right and then added it to the collar facing as it was smaller to deal with than the actual coat piece. It was good enough to show I was on the right track and then I went on to the first flannel attempt.
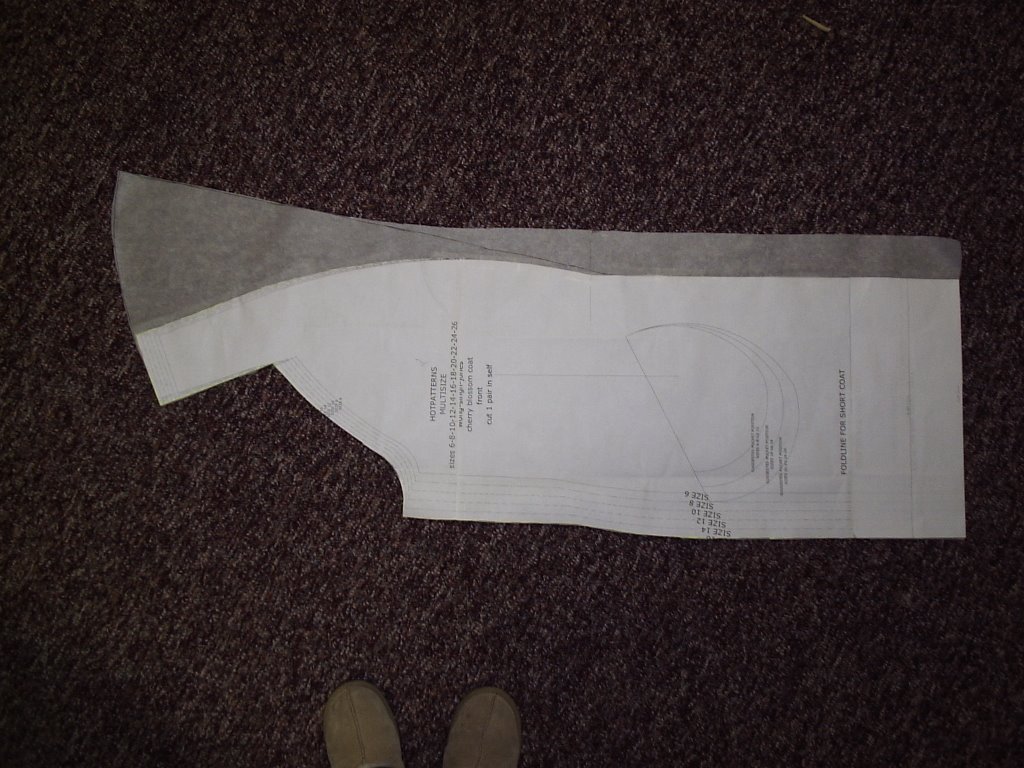
pattern piece
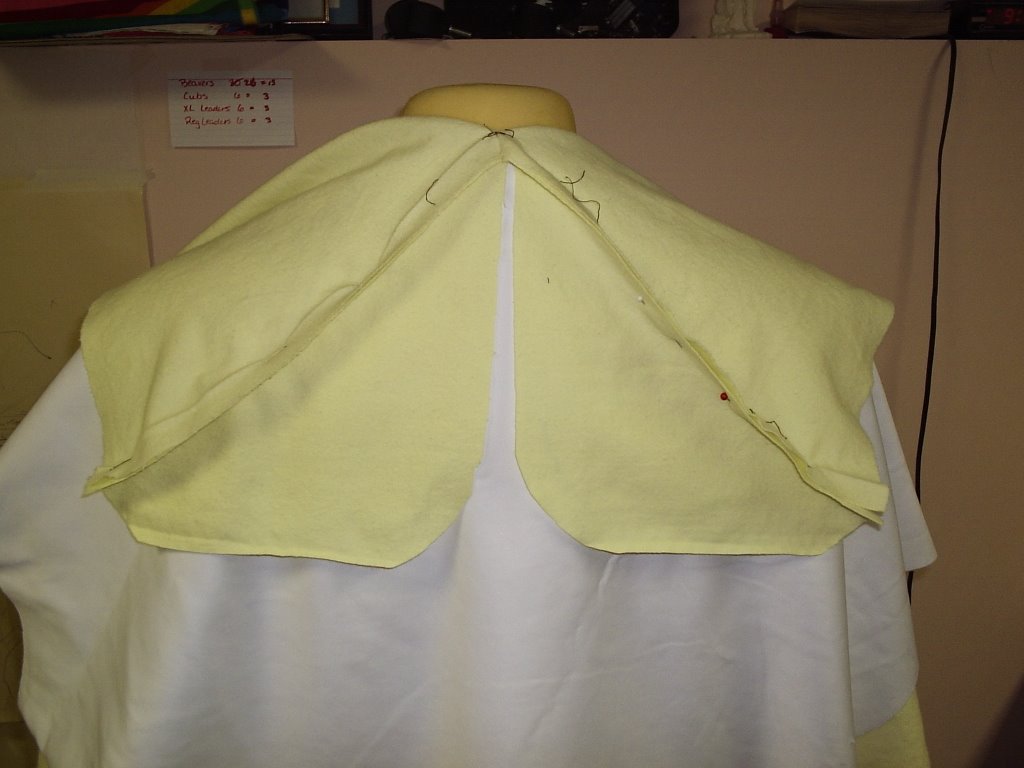
As I said before, the 2 piece sleeves are cut on the bias. I allowed another 5/8" s.a. on the sides of the sleeves and marked the original cut and seam lines. After constructing the entire coat, I tried it on without any extra layers underneath. I just wanted to see how the hood was lying. It needed some work, as it did not reach far enough in front to keep me warm. So, I ripped the basting out to about 3" from the neckline and then spread out the hood pieces to lie flat on the dummy. The space remaining was a triangle. So, I went to the scrap pile and added a piece to the space and pinned it together and tired it on. The wedge was still not quite enough, but it is closer. When I try the hood on, I see that I need to add another amount as the hood is too narrow at the top of my head.
hood fix #1

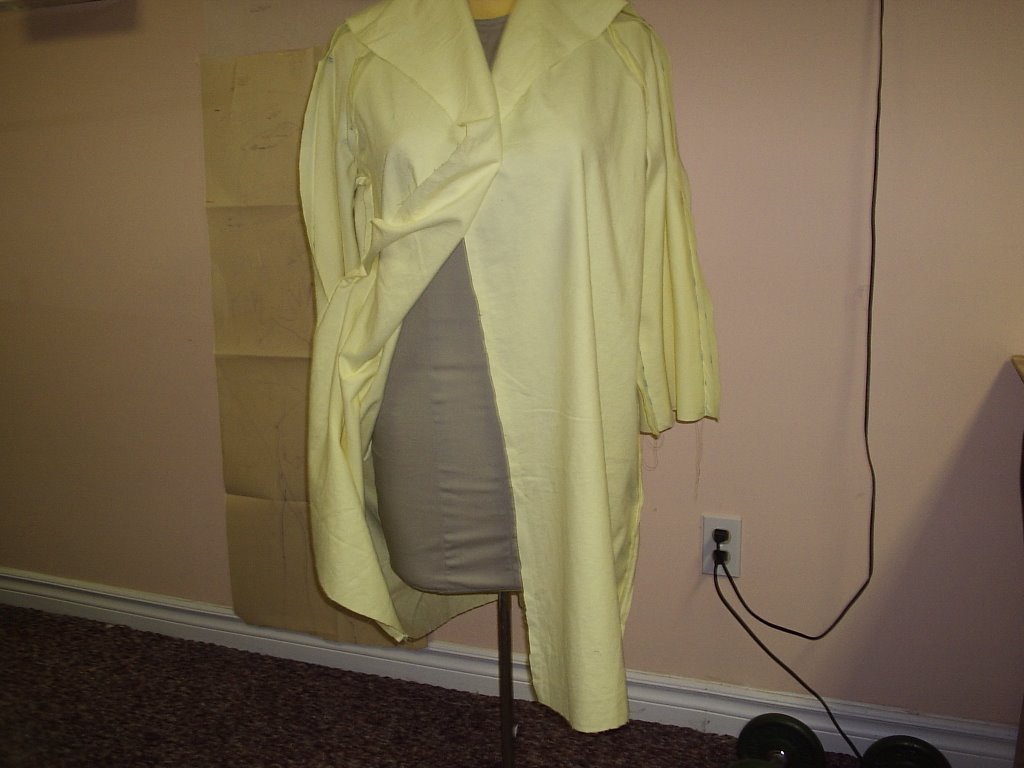
I then let Mindy try it on. I had cut out a 16 (for a 42" full bust) and did not do an FBA as I wanted to see how close it fit considering I am a 41" full bust. I knew it would have to be an FBA, but I wanted to discover just how much I needed in the muslin rather than just assuming the amount. The lines confirm, to my eyes anyway, that I need an FBA. The CF swings out and there are those drag lines pointing to the twins that mean I have to do a second muslin.

Center front #1

front view

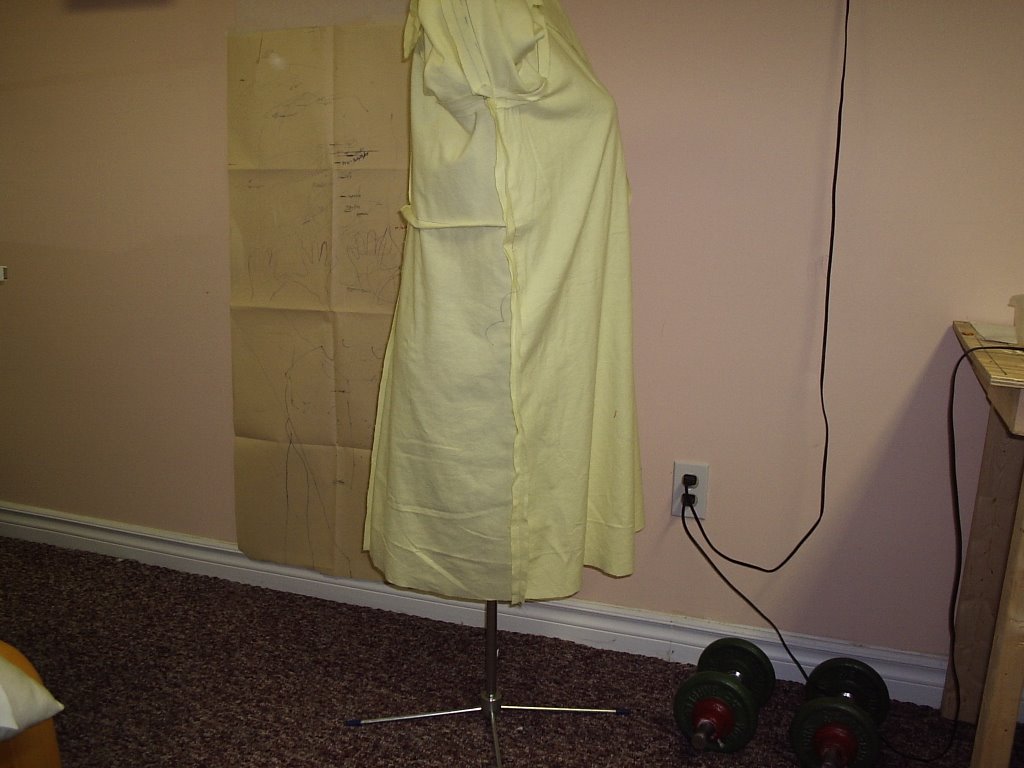
side

The other thing that I noticed was that I needed to take a dart out at the back. This stopped the s.s. from swinging forward. Does this mean I have a swayback?
rear view
So, I am off to bed now, but will revisit all these changes tomorrow. First of all though, tomorrow is Coffee Day with the ladies. After that I have to do some more painting, then I will get to the second muslin.

Tuesday, November 21, 2006

Baby steps ...

The flannel was cut out but I haven't gotten any further yet. Have to get going on that as the temps went below zero last night for the second night in a row. I have too many things on the go. I need to paint, I need to sew, I need to clean my house ... Today, I sew the flannel and see how it fits. Maybe even get the thermal layer cut out if the flannel is OK.

I am using a lining windlboc fleece from Malden Mills that I bought from wazoodle. This is a nice compact liner that will help keep me warm until it gets really cold! I am going to overlap the seams as opposed to using the regular seaming techinique. This was recommended in Threads. I may even try to flatlock on my serger with some scraps. Will have to see ...

The absentee husband called last night with details about his grad weekend in June. Garden Party followed by formal dinner. I have the garden party dress already planned, but am stumped by the formal. I am unhappy with the fit of the present fromals in the closet and want a new one. I am thinking of the Hot Patterns Bollywood Dress. I am trying to think if this would suit my figure ... I am trying to channel Nick and Stacy, here but they are silent today.

Here is my thought process ... the bodice would be great due to the neckline. The underbust gathers I think would be OK, but am not sure of the waistline gathers. Definitely no tulle underskirt! I also think I would need to lengthen the skirt to fit my height. The fullness should balance my bustline, right? But those gathers worry me under the waistband. I don't want another dress that looks OK, I want a great dress to WOW him after being away for a year!

The garden party will be one of two dresses. As it will be end June/early July and humid, I am thinking a lightweight silk. I have a nice floral silk chiffon and a nice rayon lining for comfort. The most probable dress will be this dress if I have enough fabric for the bias skirt layout:
New Look 6244

The other option is this Marfy.
Marfy 9450
It has some beautiful dart work at the waist that I think would be a challenge for me to sew but the results would be lovely! The only thing is that I think a print would hide the detailing. This would require me to shop for fabric ... not a bad thing, in itself! The challenge would be finding the right fabric in the right weight for this. It sure is fun thinking about summer dresses when the temps are falling outside!

Saturday, November 18, 2006

Delays, delays ...

I would love to be able to say that I have the muslin cut out and sewn together, but I can't. I was temporarily stumped by part of the layout. As I said before, the sleeves are on the bias. Lisa very nicely sent me a note with some advice on bias sleeves, including the tidbit that I should lay the pieces out at right angles to each other to preserve the drape. She sent me info from Roberta Carr (I later found the same info at Pattern Review) that has some lovely information in it. But for some reason, I was having problems seeing how to place the bias pieces at right angles to each other and still have them both remain on the bias. It took reviewing the Marcy Tilton article in Threads and actually seeing that (hear the "DOH!" I muttered to myself?) the pieces are laid on a single layer of fabric. It is not the Front and the Back pieces that are at right angles, but the left front and the right front that are done so. Same with the back sleeve pieces. So, brian block is over and I can get cutting now ...

How did I get around the block when each time I read the note, and sketched I kept seeing the same thing? By ignoring the cutting table and then re-arranging part of my workshop to allow me to bring in a TV and DVD player. I also moved my tabel back against the wall to give me floorspace. Now I can do my Pilates and attempt my new Yoga workouts in my shop. The goal is to do a workout prior to any sewing work once each day. That way I can't avoid the workouts due to toy placement on the rec room floor by the kids. After all, what kind of mother makes her kids destroy the forts built in front of a TV they can't watch (due to no cable hook up ;)) when I can just not work out, right? So, now the TV and DVD is in the corner of my workshop. I can now listen as I work at night and do a workout in the morning before I do any sewing/cutting. The problem now is that I have to do some serious vaccuuming and then buy a new one of those little drawer units to hold all the zips, elastics, trims and such that were sitting on the floor in a pile. And I have, unfortunately, rediscovered the mending pile ... not that I will let that stop me on the coat! It must acclimatize to its new location, right?

I'll post a photo of the new layout once I finish cleaning it up a bit more. Another advantage of the new layout is that I get to look up and see the kids' artwork while I sew!

The buzzer has gone off, so I must go and punch down the dough as the monkeys (supported by the Pilot) have asked me to make some cinnamon buns for their breakfasts this week. Then, while they are rising again, I'll go to the store ...

Monday, November 13, 2006

On Making Muslins

This is a bit of an extension of Ann's post over at the Sewing Divas. She highly recommends muslins. I do as well. I started making muslins only a year ago when I took a seminar from Peggy Sagers on pant fit. Then I made a few more in my attempts at perfecting her pattern for me. Then I made a couple of HP patterns. Now I am sold on them. I have a stash of muslin fabrics that are under my cutting table. I baste them together and often pin strips of fabric to them to add where I need to. This has saved my life a couple of times already. One thing I have to get away from, though, is the hope that I can make each muslin "wearable" and use not expensive fabric, but nice stuff all the same. I have to take that next step and realize that there is a difference between a muslin and trial garment. Kathleen Fasanella at The Fashion Incubator has a great article on this. She differs between the muslin, the prototype and the actual garment. I Have to get into a 3(ish) step mindset on garment sewing (assumes my standard inital paper alterations like FBA already done):

Step 1: muslin/cheap-o fabric for fitting only, basted together and original markings traced on;
Step 2: muslin 2 for tweaking to ensure above steps necessary and right;
Step 3: trial linings done if needed first, for final tweak
Step 4: final garment take a deep breath and cut the good stuff!

I am trying to follow this for my coat, although I am taking a bit of a short cut here. My muslin is actually some old flannel that my Mom passed on to me. Seeing as I want to interline the coat with some flannel, I am making my first go at this in the flannel. I am using the coat pieces, not the linings as there are more pieces to the wrong side of this coat than there are the outer layer! It is easier to fit the actual coat at this stage than figure out all the facings and the lining pieces! If the adjustments I made to the pattern at the paper stage are good enough, then I will start fooling around with the lining in a cheaper fabric as well. The flannel will be serged to the cashmere and then I will have the lining and the thermal layers done separately. The thermal layer I will sew last as I am considering making it a zip in layer. If I do that, I will follow the Threads article on winterizing your coat (Threads #121, pp. 46-51).

Interesting fact of the HP coat ... although the raglan sleeves look fairly loose fitted, they (and the sleeve lining) are actually cut on the bias. I have not seen that before. I can't wait to see how they look in the flannel. Question: when I cut and assemble the coat and the lining layers, should I let them hang overnight before I attach the cuffs (which are cut on grain)?

I am amazed I got that far this weekend as the Hubby and I managed to paint the living room and then rearrange the furniture and prep 3 of 4 walls in the dining room for painting as well. We inherited a border that is not my taste and it is everywhere in the ground floor of the house! They even bordered the interior of the coat closet in the foyer and the powder room. After living with it for a year, it is time to make this house mine and add some warm tones and get that border gone! This week will see the dining room done but for one wall. The hubby won't be home for 2 weeks, so I am leaving the wall with the china cabinet on it till ge hets back. I can't move it alone and I don't want the china and crystal out for 3 weeks on the table with the kids around! More time for my coat that way, right?

Tuesday, November 07, 2006

HP Cherry Blossom Coat part 1

The project on the table right now is the HP Cherry Blossom Coat. I am in the pattern proofing stage as I do the preliminary fit alterations and some design changes as well. First off, I love the lines of this coat. Second, I wish I had read the description a bit closer. Than I would have realized that this has an edge to edge closing to it rather than an overlap for buttons. If I want to wear this in the Canadian autumn and spring weather, I need to change the closure. I either add a windflap and a zipper or I extend the CF to allow for buttons. So, I have added an extension of 2 1/2" to allow for buttons. This also means I have to adjust the shawl collar and bottom facings as well as the coat. I only have to adjust the bottom facing, now. Then comes a trial run. I will use the coat rather than the lining and facings for this simply due to the number of pieces involved. I will probably use flannel as I have that in the stash and if it works out, it will be an underlining.

I am going to use some lightweight cashmere wool melton in 2 colours for the coat. The body will be a medium denim blue and the contrast will be in chocolate brown. I found both at Wazoodle a while ago. This has been aging in my stash for long enough time to sew it up before it gets too cold to wear it. For a lining, I am going to use some silk charmeuse in a nice navy that I adopted from Ressy, the Evil Fabric Queen. This will be the most lux item in my wardrobe other than my beaded silk formal seen here on Pattern Review. I figure every housewife needs to have some silk and cashmere in her wardrobe, right? I found these buttons at Darrell Thomas Textiles, a local fabric boutique that I just love! Whenever I want to fondle luscious silks, wools or cashmere, I go see Darrell! And he teaches, too! That is for another blog entry, though ...