I took a big step last week-end ... I cut out a pair of pants in a brown wool that has aged nicely in the stash for 2 years. Why the nerves over something I have successfully cut and fitted before? Because of the new fit. You see, I have been working with a trainer at work for the past six months (if you count the almost 5 weeks we were "paused" due to vacation and work load) and as a result, I have lost some inches. I was not sure how much this would matter until the Liz Claiborn pants I had purchased last fall began to actually fall off! So, I took a deep breath and decided that I would take a risk and go down a whole size on the pattern.
I pulled out the HP Razor Sharp pants pattern and cut out a size 14. Something I haven't done on pants since my early years of sewing (and those didn't even fit right!). Rather than make up muslin, I pulled out the brown wool and just went at it! I cut it out as a 14 as is with out any additions to the s.a. at all. When sewing, I did hedge and only use 3/8" s.a. on the s.s and the inseam, however, I did use the full 5/8" at CB&CF. I also did my standard curve adjustment (I lower the J into more of an L) as that is something that is standard for my figure. By eliminating the darts at the front and back, I have that little bit of ease that I need at the waist.
I gave them a quick try on a minute ago and held my breath while I turned into my corner mirrors ... WAHOOO!!!! IT WORKED!!!! The back looks AMAZING! I now have quite the nice butt in these pants! So, now all I have to do is to cut out the silk organza that I want to use as a lining and I will have a new pair of trousers for parent teacher night at the end of the week. The even better news is that now I can breathe easier and cut out another pair in the cashmere wool (lined again with the silk organza) as I now am certain of the fit!
I would show photos but I need to get to bed as we are expecting snow and freezing rain over night, so I will have to shovel in the morning. That means getting up early ...
This will really motivate me to continue on with the training as I definitely see a difference in the body shape even if the pounds are not dropping much! Who needs scales when you have a measuring tape???
I will post back tomorrow night after I come back from the Beaver meeting with Monkey Girl and have the lining cut out. Then I may have a photo to share as well. I will start to draft my review of the pattern as I go, but that will be posted much later in the week.
Showing posts with label Pants. Show all posts
Showing posts with label Pants. Show all posts
Sunday, November 30, 2008

Wednesday, August 15, 2007
Challenge complete ... Almost
Last night I managed to get the skirt to the point of only needing hemming and the zipper put into the CB seam. The zip goes up into the waistband, so that had to go on last night. As I am using an invisible zip, I left the CB seam open in order to be able to put it in on the flat. Much easier, IMO. The contrast flounce and waistband looks really sharp. I am really glad that I went with the contrast there.
The contrast tweed is really nice to work with, but is a looser weave than I thought it was. Hindsight says that maybe I should have interfaced it in the waistband. When I make the jacket, I will have to interface the body and stabilize ... a perfect opportunity to open up my Palmer Pletsch Jackets for Real People book and use it, start to finish! I plan on making the matching jacket from the HP Sportive Suit in a brown Ottoman that I have in the stash, maybe with some accents from the tweed. For a dressier look I will go for the now OOP HP pattern, the Moneypenny Kensington Jacket. It is a tailored jacket with soft shaping that will be perfect for this tweed. Once those are complete, I will actually have the basis for a SWAP capsule, I think. I will have a pair of pants (already in the Closet, made in the same green wool as the skirt), 2 jackets and the skirt. If I make another pair of pants and maybe half a dozen tops, then I am done, if I have the concept right.
For fun last night, I pinned out the back of the Chilled Out Sweatsuit pants. I pinned out a horizontal dart of about 3/4" above the crotch curve and them pesky wrinkles went away. I may baste it in and take a pic to make sure I am right. I'll add the note to my review for next time. The next pair of pants will be another HP pattern. I have the Razor Sharp Pant that could be up next, I think. I have a nice narrow wale brown cord in a tweed pattern that will be great for those ... or maybe another pair of HP Skinny Jeans.
The next up in line will be a dual track project. School starts soon and Hamster Boy needs/wants jeans. Good thing is the weather will still be warm and he can wear his shorts for at least another few weeks. So, I have 2 lengths of stretch denim in the stash, one goes for jeans, the other for his jean jacket. That will be my evenings. Days will be this dress. A dear friend has a wedding to attend in the fall and needs a dress. She is a Registered Massage Therapist and we have worked out a swap of skills. Gotta love a full body massage ...
The contrast tweed is really nice to work with, but is a looser weave than I thought it was. Hindsight says that maybe I should have interfaced it in the waistband. When I make the jacket, I will have to interface the body and stabilize ... a perfect opportunity to open up my Palmer Pletsch Jackets for Real People book and use it, start to finish! I plan on making the matching jacket from the HP Sportive Suit in a brown Ottoman that I have in the stash, maybe with some accents from the tweed. For a dressier look I will go for the now OOP HP pattern, the Moneypenny Kensington Jacket. It is a tailored jacket with soft shaping that will be perfect for this tweed. Once those are complete, I will actually have the basis for a SWAP capsule, I think. I will have a pair of pants (already in the Closet, made in the same green wool as the skirt), 2 jackets and the skirt. If I make another pair of pants and maybe half a dozen tops, then I am done, if I have the concept right.
For fun last night, I pinned out the back of the Chilled Out Sweatsuit pants. I pinned out a horizontal dart of about 3/4" above the crotch curve and them pesky wrinkles went away. I may baste it in and take a pic to make sure I am right. I'll add the note to my review for next time. The next pair of pants will be another HP pattern. I have the Razor Sharp Pant that could be up next, I think. I have a nice narrow wale brown cord in a tweed pattern that will be great for those ... or maybe another pair of HP Skinny Jeans.
The next up in line will be a dual track project. School starts soon and Hamster Boy needs/wants jeans. Good thing is the weather will still be warm and he can wear his shorts for at least another few weeks. So, I have 2 lengths of stretch denim in the stash, one goes for jeans, the other for his jean jacket. That will be my evenings.
 Days will be this dress. A dear friend has a wedding to attend in the fall and needs a dress. She is a Registered Massage Therapist and we have worked out a swap of skills. Gotta love a full body massage ...
Sunday, April 29, 2007
Daily Dragon Update #2
Well, the pants are together with the waistband facing on. I will post a pic tomorrow. I am more pleased with the smaller size and my s.a. plan seemed to have worked as I have plenty of ease even in the smaller size. Enough so that I think I will take some of it out at the s.s. and get ambitious enough to remove some of it from the vertical seamline in the back of the legs. There is some fullness there that needs to come out. I think if I use the 5/8" s.a. there and then clip the crotch curve, they will be fine. Sigh, the topstitching was so even, too. I should always do detail work while a hockey game is on. For some reason it made for great background noise and straight lines!
This will be the last incarnation of this pattern, regardless of how they turn out. I think that if I really need this pattern, I will take my Silhouette pant and re-draft from there. Why didn't I do that to begin with? Because I want to keep learning how to alter the patterns I have. That is a totally different skill set and although I do want to be able to draft my own patterns, I am not yet ready to start from scratch. That might just be a summer project for when the Pilot is back home and is settled into his new position. An ideal project to take on when it is too hot to garden and working in the basement shop is the coolest thing in town! I have been wanting to draft a pant sloper from scratch using the Armstrong book that I got for my birthday last year. I also have a pant drafting kit that my DMIL gave me years ago that I have never used. The name escapes me for the moment, but it has a number of templates that are used to draft the pattern. Not as exact, but it would be a neat experiment to try.
Well, I am off to bed. Sewing pants and watching/listening to hockey into 2 periods of overtime (OK, one period of overtime and almost 2 minutes of a second overtime period) only to see a beautifully worked for goal by the team I was not rooting for makes one tired. My Dear Father had his favorite teams in hockey, but he always gave credit where credit was due. New Jersey, you earned tonight's win. Just dont' do it again ...
This will be the last incarnation of this pattern, regardless of how they turn out. I think that if I really need this pattern, I will take my Silhouette pant and re-draft from there. Why didn't I do that to begin with? Because I want to keep learning how to alter the patterns I have. That is a totally different skill set and although I do want to be able to draft my own patterns, I am not yet ready to start from scratch. That might just be a summer project for when the Pilot is back home and is settled into his new position. An ideal project to take on when it is too hot to garden and working in the basement shop is the coolest thing in town! I have been wanting to draft a pant sloper from scratch using the Armstrong book that I got for my birthday last year. I also have a pant drafting kit that my DMIL gave me years ago that I have never used. The name escapes me for the moment, but it has a number of templates that are used to draft the pattern. Not as exact, but it would be a neat experiment to try.
Well, I am off to bed. Sewing pants and watching/listening to hockey into 2 periods of overtime (OK, one period of overtime and almost 2 minutes of a second overtime period) only to see a beautifully worked for goal by the team I was not rooting for makes one tired. My Dear Father had his favorite teams in hockey, but he always gave credit where credit was due. New Jersey, you earned tonight's win. Just dont' do it again ...
Tuesday, April 10, 2007
Revisionist Dragon-Taming ...

Two years ago I made this pair of pants from WOF. What caught my eye at that time was the seamed legs and the facing. The crotch fit leaves something to be desired, but I didn't know then what I know now! I think that the overall look on this pant is much better than the Dragon Pants. The line of the legs flatter me more than the fullness of the Dragon. I think that when I am mentally ready to make another pair, I will play a bit and see what a good morph will do for them.
That this pattern didn't work for me has nothing to do with the design of the pattern or the instructions. It just doesn't flatter my figure. Perhaps on somebody taller and slimmer ...
Tuesday, March 13, 2007
Catching up...
I enjoyed a wonderful cup of tea and conversation with Kay Young, a fellow PR member last night. We evaluated a pair of stretch cords of hers and then we had some fun with the Cherry Blossom coat. Her pants fit well enough, but we came to the conclusion that a fish eye dart is warranted in both front and back. One thing that came to me on the way home is that she could also use some reshaping of the s.s. below the hips ... they seem to bag out like jodpurs almost. When it came to the coat, we both agreed that the pockets have to come off. As designed, they give the coat a homemade look, vice a quality image. Also, we figure that I can afford to take a good inch out of the s.s. and that I need to cut off the hem allowance on the lining as the coat hem length is just right once it is turned up. So, thanks, Kay for an enjoyable evening out and for an objective pair of eyes!
The dragon pants only need hemming to be completed. Tonight they will be done and a review posted before I go to bed. I still have some issues, but I think most of them are related to the fabric choice and slight sewing errors. More on that later!
The Silhouette trousers are cut out but in temporary holding pattern as I had to throw together a quick shirt muslin for the Pilot. I have spoken about my quest for a better fitting men's shirt before in a previous post, so I won't go into that part again here other than to give an update. After cutting out a size 42, I added 1" to the CB of the bodice and then sewed the rest as is. I knew that there would be places that were too small, but wasn't sure where to add, that is why I took the Pilot and Hamster Boy to Darrell Thomas Textiles where Darrell and I spent 20 minutes writing in marker all over my first attempt. He also corrected some of my misconceptions about men's shirts. I will never see the "perfect fit" that I get on my shirts on the Pilot. Turns out those wrinkles I hate at the armscye are actually needed. Ditto with the slightly lower shoulder seam. Yup, I let the Pilot actually say, in public, "I told you so!" I figure that I have to let him say it once in a long way to keep him content (hey it has worked for 18 years so far!).
With respect to the back pleats, Darrell told me that it would look better on Brian's broad back to have move the pleats from the sides (as stated on the pattern) to a single inverted pleat at CB. He says it would be so much more flattering for his back. The neckline will fit nicely on the Pilot's neck once I add a further 1" to the front of the shirt. Right now, the front is too tight. Why didn't I cut a larger size to begin with? Because the next size up on this pattern is only 1/4" larger at CF and the neckline and still would not have been enough for him. The next size range would result in losing the best fitting shoulder and necklines I have seen to date. So, Darrell, after rightly chastising me for not flat measuring my pattern, told me where I needed to add and how much (1" to the front, neckband and collar, 1/2" to the sleeve length, 1" in length @ CF, tapering to nothing at s.s.). The adjustments are fairly minor and this pattern fits so much nicer than the KS pattern I have been using. There is some nice s.s. shaping and the body is somewhat narrower in look but not in shape.
So, I have to do muslin #2 in a lighter weight fabric than the throw away piece I chose with the changes and then go for fitting #2 next weekend when the Pilot is home again. We looked at fabrics as well and the Pilot has chosen a few of Darrell's nice Italian cottons for purchase once we have the fit down. Once we get Darrell's nod on the fit, I will buy fabric # 1 and spend a day in May with Darrell at my side as we sew up this shirt. Although I have made a few shorts before, I am looking forward to his supervision for technique and quality. He is a perfectionist who loves quality and he is such a wonderful teacher that this will be so worth the $! This muslin is not worth a photo, but # 2 will get shots and a further review.
So, that is what I have been up to! Tomorrow we are off for the second half of Spring Break with the Pilot before he heads back to work. I see wizards, towers and trains in our future ... see you everybody later tonight for the Dragon!
The dragon pants only need hemming to be completed. Tonight they will be done and a review posted before I go to bed. I still have some issues, but I think most of them are related to the fabric choice and slight sewing errors. More on that later!
The Silhouette trousers are cut out but in temporary holding pattern as I had to throw together a quick shirt muslin for the Pilot. I have spoken about my quest for a better fitting men's shirt before in a previous post, so I won't go into that part again here other than to give an update. After cutting out a size 42, I added 1" to the CB of the bodice and then sewed the rest as is. I knew that there would be places that were too small, but wasn't sure where to add, that is why I took the Pilot and Hamster Boy to Darrell Thomas Textiles where Darrell and I spent 20 minutes writing in marker all over my first attempt. He also corrected some of my misconceptions about men's shirts. I will never see the "perfect fit" that I get on my shirts on the Pilot. Turns out those wrinkles I hate at the armscye are actually needed. Ditto with the slightly lower shoulder seam. Yup, I let the Pilot actually say, in public, "I told you so!" I figure that I have to let him say it once in a long way to keep him content (hey it has worked for 18 years so far!).
With respect to the back pleats, Darrell told me that it would look better on Brian's broad back to have move the pleats from the sides (as stated on the pattern) to a single inverted pleat at CB. He says it would be so much more flattering for his back. The neckline will fit nicely on the Pilot's neck once I add a further 1" to the front of the shirt. Right now, the front is too tight. Why didn't I cut a larger size to begin with? Because the next size up on this pattern is only 1/4" larger at CF and the neckline and still would not have been enough for him. The next size range would result in losing the best fitting shoulder and necklines I have seen to date. So, Darrell, after rightly chastising me for not flat measuring my pattern, told me where I needed to add and how much (1" to the front, neckband and collar, 1/2" to the sleeve length, 1" in length @ CF, tapering to nothing at s.s.). The adjustments are fairly minor and this pattern fits so much nicer than the KS pattern I have been using. There is some nice s.s. shaping and the body is somewhat narrower in look but not in shape.
So, I have to do muslin #2 in a lighter weight fabric than the throw away piece I chose with the changes and then go for fitting #2 next weekend when the Pilot is home again. We looked at fabrics as well and the Pilot has chosen a few of Darrell's nice Italian cottons for purchase once we have the fit down. Once we get Darrell's nod on the fit, I will buy fabric # 1 and spend a day in May with Darrell at my side as we sew up this shirt. Although I have made a few shorts before, I am looking forward to his supervision for technique and quality. He is a perfectionist who loves quality and he is such a wonderful teacher that this will be so worth the $! This muslin is not worth a photo, but # 2 will get shots and a further review.
So, that is what I have been up to! Tomorrow we are off for the second half of Spring Break with the Pilot before he heads back to work. I see wizards, towers and trains in our future ... see you everybody later tonight for the Dragon!
Sunday, March 04, 2007
It's not Procrastinating if you have a Plan ...
I know, I promised the coat would be photo'd and mostly rip stitched, but I have to confess that I have not touched it other than to try it on again. BUT, I have a plan, you see. Stop rolling your eyes, this is a great one! You see, I have a date with Kay Y. a friend from PR that lives here in Canada's National Capital. We are going to have a mini fit fest in two weeks! I am helping her fit a pair of pants/jeans and she will help me with the coat. She has made a few coats, so this will be a big bonus! So, I have a plan and it is actually achievable. So, in the business plan world, I am set! So, you just have to settle for the pants shots once I get a chance to upload them.
I have been thinking about those Jalie pants that I altered a ways back. The CB really, really drops low due to the removal of all that excess fabric. I found some extra fabric in the stash today. In order to bring that CB up to the proper placement, I think I will rip the waistband off from the s.s. and then add a back yoke to fill in the space. The will make them wearable again. This is a pressing matter as I need a pair of blue pants for a Scouts Canada medal presentation next weekend. I am one of the local recipients of the Scouts Canada Centennial medal and although I usually wear jeans with my leader's uniform, they would not be appropriate for this instance. The Dragon pants would have been perfect for this occasion had I not fused some iron on flowers on the back pockets. Although I could remove the pockets and replace them with plain ones ... it is not too late. But the alterations to the Jalie pants are still needed anyway. Time to flip the job coin ...
I have been thinking about those Jalie pants that I altered a ways back. The CB really, really drops low due to the removal of all that excess fabric. I found some extra fabric in the stash today. In order to bring that CB up to the proper placement, I think I will rip the waistband off from the s.s. and then add a back yoke to fill in the space. The will make them wearable again. This is a pressing matter as I need a pair of blue pants for a Scouts Canada medal presentation next weekend. I am one of the local recipients of the Scouts Canada Centennial medal and although I usually wear jeans with my leader's uniform, they would not be appropriate for this instance. The Dragon pants would have been perfect for this occasion had I not fused some iron on flowers on the back pockets. Although I could remove the pockets and replace them with plain ones ... it is not too late. But the alterations to the Jalie pants are still needed anyway. Time to flip the job coin ...
Sunday, February 11, 2007
Taming the Dragon ...
I couldn't do it. It kept me up last night, that red gabardine. Even though I was thinking muslin, I was internally hoping this version would actually be wearable. The only problem is I really don't have much in the Closet or stash to coord with red pants. Then there is the internal Stacy and Clinton snarking away about who wears red pants (or was that me channelling my mother?) ... so I went deep into the stash and found a classic navy blue gab instead. It was pre-washed and needed a fast pressing, so out it came. I have now cut it out and it is awaiting interfacing and edge finishing. I usually do this before I start any seams.
Changes to the pattern:
1. straighten the CF
2. added 5/8" @ s.s. starting at the bottom of the pocket area
3. added same to the pocket pieces and waistbands pieces
4. removed the dart at the seam at the front seam by straightening out the seamlines.
5. lowered the crotch "curve" and shortened the extension by approx 1 1/2"
(below is the inner back leg piece with the new cutting lines in red and the new seamline in blue)

It does seem that I have lots of gab in the stash, but most of it is poly cotton blends, I believe. My mother went on a buying binge years ago (I was Hamster Boy's age, I believe) with thoughts of a June Cleaver type wardrobe, I think, in classic navy and grey with the red for a jacket, I believe. Last summer, she "forced" me to take the majority of it home with me. I honestly can't see me wearing it. It's not that I don't like red, I have a couple of nice red sweaters and tops that I wear often. I have a red linen that is awaiting spring for a blouse. But I can't see myself wearing that much red. Maybe trench for spring? Yeah, right! I already have 2 coat UFO's, I don't need another!
As I have almost finished taming the Dragon, my mind is beginning to wander to the next project. Definitely the Twisted Turtleneck, first mentioned by Diva Phyllis over at the Sewing Divas. I have a white cotton lycra that would be perfect for this design. I plan on using the Simplicty twist top pattern as the basis of the top. When that one is finished, I plan on using a brown Pucci type print in browns and greens for a knock off of a new Jalie top that has an empire waist and a V front with a raised neckline. Leslie posted a review of hers over at PR the other day. I really like the look of it, but I don't want to spend $15 with shipping and taxes for a look that I think I can easily achieve using a Kwik Sew pattern already present (and fitted) in the stash. All I have to do is to eliminate the overlap, make a CF seam and raise the neckline in the back and shoulder area. I will have to play with that aspect of the design, but it will be fun to do! Another design growing in my head is to take my TNT princess T pattern and to add sideseam ruching and try to twist the center panel. I have some nice brown knit for that one. With some nice teal thread for contrast, it should be really nice, if I can get it to work.
These are all further attempts at pattern re-drafting for me, something I find I enjoy doing immensely! I have Armstrong's pattern drafting book and I find I am looking at patterns and garments in the stores in a whole new light as I try to figure out how they are made. I find myself looking closer at the stash to see which patterns I can actually morph to copy the details I like. I do more work in my head than I do in the actual workshop, but small steps first, right?
Changes to the pattern:
1. straighten the CF
2. added 5/8" @ s.s. starting at the bottom of the pocket area
3. added same to the pocket pieces and waistbands pieces
4. removed the dart at the seam at the front seam by straightening out the seamlines.
5. lowered the crotch "curve" and shortened the extension by approx 1 1/2"
(below is the inner back leg piece with the new cutting lines in red and the new seamline in blue)

It does seem that I have lots of gab in the stash, but most of it is poly cotton blends, I believe. My mother went on a buying binge years ago (I was Hamster Boy's age, I believe) with thoughts of a June Cleaver type wardrobe, I think, in classic navy and grey with the red for a jacket, I believe. Last summer, she "forced" me to take the majority of it home with me. I honestly can't see me wearing it. It's not that I don't like red, I have a couple of nice red sweaters and tops that I wear often. I have a red linen that is awaiting spring for a blouse. But I can't see myself wearing that much red. Maybe trench for spring? Yeah, right! I already have 2 coat UFO's, I don't need another!
As I have almost finished taming the Dragon, my mind is beginning to wander to the next project. Definitely the Twisted Turtleneck, first mentioned by Diva Phyllis over at the Sewing Divas. I have a white cotton lycra that would be perfect for this design. I plan on using the Simplicty twist top pattern as the basis of the top. When that one is finished, I plan on using a brown Pucci type print in browns and greens for a knock off of a new Jalie top that has an empire waist and a V front with a raised neckline. Leslie posted a review of hers over at PR the other day. I really like the look of it, but I don't want to spend $15 with shipping and taxes for a look that I think I can easily achieve using a Kwik Sew pattern already present (and fitted) in the stash. All I have to do is to eliminate the overlap, make a CF seam and raise the neckline in the back and shoulder area. I will have to play with that aspect of the design, but it will be fun to do! Another design growing in my head is to take my TNT princess T pattern and to add sideseam ruching and try to twist the center panel. I have some nice brown knit for that one. With some nice teal thread for contrast, it should be really nice, if I can get it to work.
These are all further attempts at pattern re-drafting for me, something I find I enjoy doing immensely! I have Armstrong's pattern drafting book and I find I am looking at patterns and garments in the stores in a whole new light as I try to figure out how they are made. I find myself looking closer at the stash to see which patterns I can actually morph to copy the details I like. I do more work in my head than I do in the actual workshop, but small steps first, right?
Monday, January 15, 2007
Jalie Redux or Thanks Kathleen Cheetham!
What a day! Mid January and the thaw is over ... not that we really froze to begin with up here. IT has been hard to believe that I live on the same latitude as Moscow! We got about 4 inches of snow today. Not much, but enough to make people really silly when driving! Even so, I was only 10 minutes late for the second interview only to find out they were expecting a phone call asking to delay. Really? And how serious a candidate would I be if I had to do that considering it was only 4"? And considering that I learned to drive in this type of weather on the Atlantic seaboard?
The interview went well, I got very good vibes off of this as I did not see any others being interviewed, unlike last week. Not to mention that they were going to call me tonight with the results. But I am out this evening with Scouts, so they have to wait till tomorrow to tell me!
What did I wear, curious divas want to know? Hee hee ... nothing new I am afraid. Headache last night stopped me from doing anything more. So, the cardigan topped a RTW silk knit top in a nice teal worn over my Jalie pants. As I noted in my review of these pants, there were some fitting issues that needed addressing. I have since altered them a bit. A few issues back in Threads there was an article by Kathleen Cheetham on altering the back of RTW or already completed pants. I immediately thought of these pants and decided that this was a way to fix my back problem. So, here is the before shot:
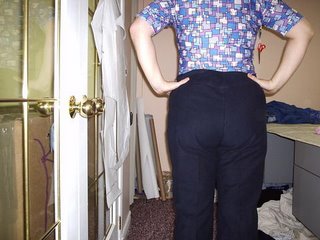
What I did was to remove the excess by pinning a horizontal tuck along the widest part of the back, tapering to nothing at the s.s.. Measuring the tuck (about 2 1/2" YIKES), I then lowered the waistband the same amount, cutting off the extra fabric. I will alter the pattern to reflect the change in the back pattern piece. I also made the vertical adjustment, pinning out a 5/8" vertical tuck from the bottom of the crotch area to the knee. As per the article, I then removed this amount from the back inseam only, tapering to nothing at the knee area. That I have to do this is not a surprise to me as I had originally added a bit extra to the crotch points and I think this is only removing that excess. I still have to hitch the pants up a smidge (as I am doing in the photo), but doing any further changes at this weight will result in a sever wedgie! So, I will live with the slight excess until I drop a few more pounds. Here is the much improved after shot:
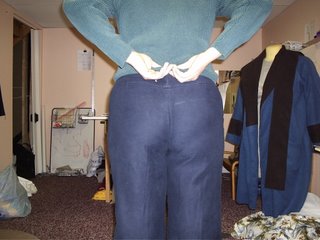
Now the debate is whether or not I use the same size next time! I seem to have taken a lot out doing these fixes. Is it worth starting over again when I know how to fix this size? The other thing I have noticed is that the waistband placement needs to be lowered at the s.s. as it has a curved appearance right now. Something else to do in the next version! I think I will stick with this size for now. Maybe when a few more pounds come off I will downsize (pun fully intended!) And yes, that is the HP Cherry Blossom coat in the background, resting on Mindy. I still haven't hemmed it. You have to be in the mood for handwork, you know? And awake, too!
The interview went well, I got very good vibes off of this as I did not see any others being interviewed, unlike last week. Not to mention that they were going to call me tonight with the results. But I am out this evening with Scouts, so they have to wait till tomorrow to tell me!
What did I wear, curious divas want to know? Hee hee ... nothing new I am afraid. Headache last night stopped me from doing anything more. So, the cardigan topped a RTW silk knit top in a nice teal worn over my Jalie pants. As I noted in my review of these pants, there were some fitting issues that needed addressing. I have since altered them a bit. A few issues back in Threads there was an article by Kathleen Cheetham on altering the back of RTW or already completed pants. I immediately thought of these pants and decided that this was a way to fix my back problem. So, here is the before shot:

What I did was to remove the excess by pinning a horizontal tuck along the widest part of the back, tapering to nothing at the s.s.. Measuring the tuck (about 2 1/2" YIKES), I then lowered the waistband the same amount, cutting off the extra fabric. I will alter the pattern to reflect the change in the back pattern piece. I also made the vertical adjustment, pinning out a 5/8" vertical tuck from the bottom of the crotch area to the knee. As per the article, I then removed this amount from the back inseam only, tapering to nothing at the knee area. That I have to do this is not a surprise to me as I had originally added a bit extra to the crotch points and I think this is only removing that excess. I still have to hitch the pants up a smidge (as I am doing in the photo), but doing any further changes at this weight will result in a sever wedgie! So, I will live with the slight excess until I drop a few more pounds. Here is the much improved after shot:

Now the debate is whether or not I use the same size next time! I seem to have taken a lot out doing these fixes. Is it worth starting over again when I know how to fix this size? The other thing I have noticed is that the waistband placement needs to be lowered at the s.s. as it has a curved appearance right now. Something else to do in the next version! I think I will stick with this size for now. Maybe when a few more pounds come off I will downsize (pun fully intended!) And yes, that is the HP Cherry Blossom coat in the background, resting on Mindy. I still haven't hemmed it. You have to be in the mood for handwork, you know? And awake, too!
Friday, November 10, 2006
"Threads" and altering pants
I received the latest issue of Threads this week. In it there is an article on how to adjust the back of pants that are baggy. http://www.taunton.com/threads/pages/th_128_048.asp It speaks of how to alter pants that are already sewn or are RTW. I have a couple of pair that I Want to try this method out on. I'm going to post pix at all stages to see if this will really work as well as they say it does. Maybe I don't have to rush to cut out new pants after all ... this could be a way to salvage those pants that were "good enough" but that I couldn't fix.
In a nutshell, it says that you pin out the excess through those wodnerful fisheye darts and then transfer the excess out. Vertical darts go to the inseam and the horizontal ones go north to the waist seam. Query, does it matter which one you do first if you have to do both?
The two pair of pants I need to play with have different problems. The Jalie pant http://sewing.patternreview.com/cgi-bin/readreview.pl?readreview=1&reviewnum=13219 needs a horizontal dart to remove fullness there, but I knew that going in as I made these up just after a seminar with Peggy Sagers. I tried to see if the dart was necessary or not. Turns out it was. The other pair is a WOF pattern http://sewing.patternreview.com/cgi-bin/readreview.pl?ID=8602 that I think needs major work int he back in the line of both darts. I will let you know how this works ...
In a nutshell, it says that you pin out the excess through those wodnerful fisheye darts and then transfer the excess out. Vertical darts go to the inseam and the horizontal ones go north to the waist seam. Query, does it matter which one you do first if you have to do both?
The two pair of pants I need to play with have different problems. The Jalie pant http://sewing.patternreview.com/cgi-bin/readreview.pl?readreview=1&reviewnum=13219 needs a horizontal dart to remove fullness there, but I knew that going in as I made these up just after a seminar with Peggy Sagers. I tried to see if the dart was necessary or not. Turns out it was. The other pair is a WOF pattern http://sewing.patternreview.com/cgi-bin/readreview.pl?ID=8602 that I think needs major work int he back in the line of both darts. I will let you know how this works ...
Subscribe to:
Posts (Atom)


